Latest Post

How To Fix 'The Hosted Network Couldn’t Be Started' in Windows


Method 1:
  • Open 'Device Manager' and click on 'View' > 'Show Hidden Devices'
  • Now navigate to 'Network Adapters' and browse to 'Microsoft Hosted Network Virtual Adapter'
  • Right click on it and choose 'Enable'
Now the hosted network is connected.


Method 2 :
  • Go To Control Panel > Select 'System and Security'
  • Then 'System' > 'Device Manager'
OR
  • Open Run and type devmgmt.msc and hit enter.
  • Now 'Device Manager' window will open.
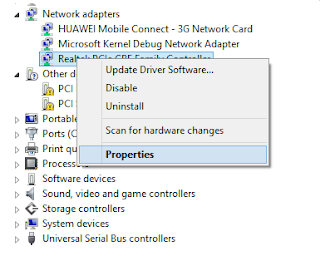
    • Select and expand the Network adapters from the list of devices.
  • Now Find your wireless network adapter and right-click on it and select 'Properties'


Note : If your Wi-Fi adapter is not listed in the device manager you might need to restart your computer. The below 2 next steps are not really required, what you need to do is to enable your device now.
  • Select the 'Power Management' tab.
  • Make sure Under the 'Power Management' tab, the following option is checked (enabled):

    Allow the computer to turn off this device to save power
     
  • If not just Enable it and click ok.
# Now restart your PC and try sharing your Wi-Fi. In most cases this steps will fix the problem.


.  

Fix Microsoft Update Error Code 0x80080008 while installing Windows Updates

Windows Update receive the following error message:

There were some problems installing updates, but we'll try again later. If you keep seeing this and want to search the web or contact support for information, this may help: (0x80080008)

Windows Update:


How to Fix Windows 10 Update Error 0x80080008
Method 1:

First, run the Microsoft Fix it.
Fix the problem with Microsoft Windows Update that is not working
http://go.microsoft.com/?linkid=9830262

This option Shows “Service Registration is missing or corrupt”.


Method 2:

Also, follow these steps to start the Windows Update service
Start (Right Click) > Command Prompt (Admin) > Yes

net start bits

&

#Re-register
Windows Update server:

  • Stop the Windows Update service:
    net stop wuauserv
  • Type the following to re-register the concerned DLL file:
    regsvr32 %windir%\system32\wups2.dll
  • Finally, restart the Windows Update service:

    net start wuauserv

## This helps resolve your issue.


Method 3:

Open Command Prompt (Admin)

SFC /SCANNOW

This finished successfully and found no errors.


Method 4:

Open Notepad, copy this into it and save it as a  WinUpdateFix.bat  file on Desktop.

REGSVR32 WUPS2.DLL /S
REGSVR32 WUPS.DLL /S
REGSVR32 WUAUENG.DLL /S
REGSVR32 WUAPI.DLL /S
REGSVR32 WUCLTUX.DLL /S
REGSVR32 WUWEBV.DLL /S
REGSVR32 JSCRIPT.DLL /S
REGSVR32 MSXML3.DLL /S

After running this batch script, it finished with no visible errors. Then reboot


Method 5:

Start a Command prompt in administrator mode and use this command:

dism.exe /online /cleanup-image /restorehealth

Let it finish running, then reboot and try updates again.


.

FIX "We couldn't complete the updates Undoing changes Don't turn off your computer" Error in Windows 10


Windows 10 Update KB3081424 Causing Endless Reboot Loop

Microsoft has rolled out a cumulative update for Windows 10 KB3081424 that contains security fixes. The Update was actually meant to fix several issues related to VPN, Cortana, AMD Drivers, Explorer stability and other fixes so as to enhance the stability of the operating system. But, the users are reporting issues while installing this update for the new Operating system who tried to install that update on their devices caused endless reboot issue.
You can now Download KB3081424 Windows 10 Update.
It downloads and starts reboot to install. The updates gets installed to some percent and again reboots. The same thing repeats and lastly it shows “Something went wrong so uninstalling the update.” The issue is mainly caused by invalid user SID entries in the Windows Registry. This way the updates are not installed properly and here is the solution to fix this issue.


How to Fix this Issue?


Method 1:

Follow the below steps to fix the issue using Windows Registry.

Note:
It is recommended that you create a System Rrestore Point or backup before making changes to your Windows registry.

  • Initially, Press Windows + R key that opens RUN window.
  • Type regedit in the box and click OK.
  • It then redirects to a new window Registry Editor in which you need to navigate through the following Registry KEY.
    HKEY_LOCAL_MACHINE\SOFTWARE\Microsoft\Windows NT\CurrentVersion\ProfileList
  • Navigate using the above key wherein you find list of all user profiles that exist on the machine.
  • The entries S-1-5-18, S-1-5-19 and S-1-5-20 are used by the system and they must be left alone.
  • If you have more than one i.e., S-1-5-21* entry, this must be removed by right clicking on that and click on Delete so that you may be able to fix the issue.
  • Click on each profile starting with S-1-5-21 to link it to a user account on the system.
  • You can do so by looking at the Profileimagepath value after selecting the account.
  • Make sure you do not delete the admin profile.
  • Delete the keys of all selected accounts and then Restart the computer.

In this way you can fix the Windows 10 KB3081424 update issue. Try the above process and fix the issue. If it works then it would be fine, or else, if you wish, you can restore your computer back to the created System Restore Point.


Method 2: (Hide KB3081424 Update)

How to temporarily prevent a Windows or driver update from reinstalling in Windows 10

To uninstall an unwanted Windows Update:
  • Type “View Installed Updates” in the Search box and then click on View Installed Updates – Control Panel from the Search results.
  • To uninstall the unwanted update, select it from the list and then click Uninstall.

Hide Updates:
 

To temporarily prevent the driver or update from being reinstalled until a new driver or updated fix is available, a troubleshooter is available that provides a user interface for hiding and showing Windows Updates and drivers for Windows 10. You can obtain and run the "Show or hide updates" troubleshooter by downloading it from the Microsoft Download Center.

Download & Run:
Download "Show or hide updates" Troubleshooter

 
The KB 3081424 update was the third Windows 10 update and the previous two also caused problems. The first update automatically installed new drivers that caused issues for people that have multiple monitor setups and Nvidia graphics cards.
The second update which is known as KB 3074681 caused the Windows Explorer file system to crash repeatedly for many users.


Method 3:

Troubleshoot Problems with installing updates

Here are solutions to some common problems with installing updates.
You might be able to automatically fix some problems by running the Windows Update Troubleshooter

More Info


# Disable Windows Updates:

>>  Disable Auto Windows Updates & Auto Restart


.

How to Clean Install Windows 10


Windows 10 System Requirements
  • Processor: 1 gigahertz (GHz) or faster
  • RAM: 1 gigabyte (GB) (32-bit) or 2 GB (64-bit)
  • Free hard disk space: 16 GB for 32-bit OS 20 GB for 64-bit OS
  • Graphics card: Microsoft DirectX 9 graphics device with WDDM 1.0 driver
  • Display: 800x600 screen resolution
  • Internet access to activate

How to Install Windows 10:
  • If you have not already, you will need to create a bootable Windows 10 installation USB/DVD
  • Turn on your PC so that Windows starts normally, insert the DVD or USB flash drive, and then shut down your PC.
  • Restart your PC, and then press any key to boot from the DVD or USB flash drive.
    • If you restart your PC and your current version of Windows starts, you might have to open a boot menu or change the boot order in your PC's BIOS or UEFI settings so that your PC boots from the media. To open a boot menu or change the boot order, you'll typically need to press a combination of keys (such as F2, F12, Delete, Esc, etc.) immediately after you turn on your PC.
    • For instructions on changing the boot order for your PC, check the documentation that came with your PC or go to the manufacturer's website.
    • If your current version of Windows still starts, try again by waiting until Windows asks you to sign in, shutdown completely, and then restart your PC again.


    On the Install Windows page:
  • Select your Language preferences, and click on Next


  • Click on the Install Now button to start the installation

  • Enter your Windows 10 Product key to activate Windows 10 with, and click on Next
OR
  • Click on Skip
    (The new Windows 10 OS automatically recognized it is installed on an eligible Windows 7/8.1 PC and activated itself OR Activate It Manually)


  • Check the I accept the license terms box, and click on Next.


    • Click on the Custom: Install Windows only (advanced) option.


    • Select the hard drive or partition that you want to install Windows 10 on,
      (*Drive 0 Partition 3 = C Drive)
      • Create a new hard drive partition

        OR
      • Select C Drive (Old Windows OS) Then Format selected C Drive, again Select C drive Click on Next
      • The installation of Windows 10 will now begin.


      NOTE: During the installation process, your screen may flash and computer will restart a few times.

      • When you reach this point, click on Use express settings OR Customize settings for how you want to set these settings,


      # Click on Customize settings

      • Turn On or Off the Personalization and Location settings you would like, and click on Next. (Turn Off Everything)


      • Turn On or Off the Browser and protection and Connectivity and error reporting settings that you want, and click on Next.
        (Turn Off Everything)

       
      • Windows will now check for an Internet connection.


      Note:

      • If you do have an internet connection, then go to Method 1
      • If you do not have an internet connection, then go to Method 2

      Method 1:

      • Select who owns this PC, (Select I Do) and click on Next.
      • Set up Windows 10 to sign you in with a local account or Microsoft account.

      1. Set up Microsoft account (you can Skip this step)


      2. OR Use Local account.
          Click on the Skip this step link


      # If you select Local Account then
      Type in a user Name, Password, and Password Hint for your Local user account (administrator type),
      click on Next


      • Installation is finished Soon, you will be on your desktop in Windows 10 (Wait for Sometime)


      Done.

      Enjoy All New Windows 10

      .


      How to Boot Into Safe Mode In Windows 10


      1. Use the System Configuration Tool:

      Goto:
      Run > msconfig  > OK

      Go to the Boot tab and, in the Boot options section check the box  "Safe boot".
      Then, click or tap OK.


      Click Restart Or Exit without Restart depending on whether you want to restart now or later.


      2. Use Shift + Restart

      Press Start Menu > Power button at the Windows login screen or in the Power Menu
      Then, Press and hold the SHIFT key on your keyboard and click Restart.
      ( Shift Key + Restart )


      Windows asks you to choose an option:
      Select Troubleshoot  > Advanced options > Startup Settings

      You are informed that you are about to restart in order to change several Windows options, including enabling Safe Mode. Press Restart.

      Your computer or device restarts again and displays nine startup settings, including Safe Mode, Safe Mode with Networking and Safe Mode with Command Prompt

      Press the F4 key on your keyboard, to enable Safe Mode,
      F5 to enable Safe Mode with Networking and
      F6 to enable Safe Mode with Command Prompt.


      3. Safe Mode using Command Prompt (CMD)

      >> Open an Command prompt.

      Start
      (Right Click) > Command prompt (Admin) > Yes.

      # To Start Windows 10 in Normal Mode:


      bcdedit /deletevalue {current} safeboot


      # To Start Windows 10 in Safe Mode:

      bcdedit /set {current} safeboot minimal


      # To Start Windows 10 in Safe Mode with Networking:

      bcdedit /set {current} safeboot network


      # To Start Windows 10 in Safe Mode with Command Prompt:

      bcdedit /set {current} safeboot minimal


      Then
      bcdedit /set {current} safebootalternateshell yes


      ## Enter to instantly Restart the Computer:

      shutdown /r /t 00


      4. To Add "Safe Mode" to Desktop Context Menu

      1. Download the file below.

      Add_Safe_Mode_to_Desktop_Context_Menu.zip

      2. Save the .zip file to your desktop, and Extract it.

      3. Open the Extracted Folder
      Add_Safe_Mode_to_Desktop_Context_Menu.reg  file and  Safe_Mode folder to your desktop.

      4. Move the Safe_Mode folder into the C:\Windows folder

      5. If prompted, click on Continue and Yes  to approve.

      6. Double click/tap on the extracted Add_Safe_Mode_to_Desktop_Context_Menu.reg file to merge it.

      7. If prompted, click on Run, Yes , Yes, and OK to approve.


      .

      Create System Restore Point in Windows 10


      Steps:
      • Open the Win+X Power User Tasks Menu, click/tap on System.
      OR
      • This Pc (My Computer) Icon > Right click > Properties
      • Click/tap on the System protection link on the left side.
      • Make sure that you have System Protection turned on for all drives that you want included in the restore point.
      • When ready to create a restore point, click/tap on the Create button.


      • Type a description you want to help you identify the restore point.
        The current date and time are added automatically. Click/tap on Create when finished.


      • Windows System Protection will now create a restore point.


      •  When successfully created, click/tap on Close it.
      •  Done

      .

      Author Name

      {picture#https://instagram.fbom1-2.fna.fbcdn.net/t51.2885-19/s150x150/17662158_221658868312088_138323287238246400_a.jpg} Hi, I am Swapnil Zambare. I love to explore Computer and Internet. My aim is to spread tips and tricks related to Hacking, Computer, Android phones, Blogging, SEO, Social networks and many mores all over the world for free so that every one can enjoy our Premium Services for Completely Free. {facebook#https://www.facebook.com/SwapnilTech} {twitter#https://twitter.com/swapnilzambare7} {google#YOUR_SOCIAL_PROFILE_URL} {pinterest#YOUR_SOCIAL_PROFILE_URL} {youtube#YOUR_SOCIAL_PROFILE_URL} {instagram#https://www.instagram.com/theswapnilzambare/}

      Contact Form

      Name

      Email *

      Message *

      Powered by Blogger.