Articles by "Android"

Showing posts with label Android. Show all posts


How to Download APK Files from Google Play Store to PC
Google Play Store, by default, doesn’t allow the download of APKs for free games and apps stored there and it installs the requested app or game on the device directly. If you want to download and install the APK files for certain games and apps from Play Store on your Android device using your computer, then there are some solutions which let you download APK files from Plays Store right on your PC.

After downloading the APK files on your computer, you can then install the APK files on your Android phone or tablet using any Smartphone manager or by directly transferring the APK file to your device using any connectivity medium like USB connectivity data cable or BlueTooth.


How to Download APK with Online APK Downloader:
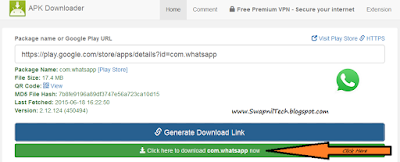
  • In the Box labelled “Package name OR Google Play URL” Enter either the Google Play URL or Package name of the app which you want to download.
  • No Click on the Blue-colored “Generate Download Link” button, The App will be fetched and A Green button to Download the App/apk will appear below the Blue “Generate Download Link” button.
  • Click on Green button (Download button)
  • Save It.
APK Downloader Websites:

1.
Evozi.com 


                          http://apps.evozi.com/apk-downloader/ 


2. Downloader-apk

http://downloader-apk.com/
  

3. Apk-dl.com 

http://apk-dl.com/


4. Apkleecher.com 


5. Freeapk.ru 


# Download Offcial Android Apps Latest Updates
Without Google Play Store:


>>  www.apkmirror.com


Download Apk from Google Play without Device ID - Online Apk Downloader

Enjoy.. :D

.


Transfer Data From Android To PC/Laptop Using WIFI

Sync Features:
• Send files to computer (and vice versa) without USB data cable (without external network support)
• Data transfers in private (local) Wi-Fi network (easy, secure, fast and no data plan impact)
• Transfer speed up to 300Mb/s
• Compatible with Windows Explorer and other FTP client tools (such as FileZilla)


Steps To Transfers Data From Android Phone To PC
  • First of all you have to an same WiFi network connection on computer or your android phone.
  • Then simply Download the Software Data Cable app from Google Play Store.

     Download Here
  • Install the app in your Android phone and click on Start Service.


  • Then it will show you  ftp://192.168.1.5:8888  address,
    Simply copy the address or fill into your computer address bar and click OK.
    It will show you storage folder where your all files stored now you can transfers the data from your android phone to computer or vice verse.


# Similer Wifi File Sharing Android Apps:

 SHAREit 

 WifiDroid  

 Wireless File Transfer

 WiFi File Transfer


.


How to Remove Bloatware (Pre-Installed Apps) from Android Device


# Removing Bloatware Apps In Non Rooted Android

Some of the stock apps are there that mostly have of no use, so better is to remove them from your device as you can’t remove them as such.


Requirements:
The program requires that your manufacturer USB drivers are installed for your specific device as well as the following:
• Windows Operating System
• USB Debugging turned on for your device
• Root or KitKat and above running on your device


Steps:
  • First of all you need to enable developer option which you can enable by heading to
    Settings > About Phone -> Build Number
    (Tap on build number 7-10 times and your developer options will get activated)
  • Now you will see developer option in your settings and tap on it and scroll down and
    Enable  USB Debugging.

       
  • Now you need to download and install Debloater tool in your windows PC that will allow you to remove system apps from your device.
  • Now connect your android device with USB cable with your PC and wait for the tool to detect your device.
  • Now after the device is detected you will scan the apps that being currently installed in your device and that includes your system apps.
  • Now mark up the apps that you want to remove from your device and then you just need to click on apply button and this will block all those apps from your device and they will be no longer there in your device to consume your memory.

      
  • You can also undo this process by un-ticking them to access them again.
  • Thats it you are done, now all those apps will be removed mfrom your device and you device storage will be free from them.


# Removing Bloatware Apps In Rooted Android


# Using NoBloat App


ROOT REQUIRED !!!

NoBloat lets you delete unwanted apps that come pre-installed with your phone. Simply select the bloatware that you want to get rid of and click delete. NoBloat can automatically place backups on your external storage which you can restore at any time.


NoBloat features:
* Disabling and enabling system apps
* Creating backups of system apps and restoring them
* Deleting system apps
* Creating a blacklist of system app to delete
* Batch operation to backup/remove all blacklisted system apps
* Batch operation to enable all disabled system apps
* Batch operation to restore all backups
* Export your settings and blacklist to the external storage to import them later
* Quickly find apps using the search functionality
* Change backup folder location


 Download Here (FREE)   ||   Download Here (Paid)  


Remix OS for PC: How to install the Google Play Store

Remix OS is a custom version of Android designed to make Google’s mobile operating system feel like a desktop OS. Initially only available as an operating system that came pre-installed on hardware, this week the developers at Jide made it easy for anyone to try Remix OS


Download and install Google Mobile Services on Remix OS

Note:
You’ll want to do this while running Remix OS in resident mode.
If you run in guest mode, anything you do will be erased after you reboot you PC and since the instructions require a reboot, that means there’s currently no way to install the Play Store in guest mode.

Steps:

1. Download the   GMSInstaller.apk   OR   GMSInstaller.apk   

2. Click the downloaded file to Install it.

3. Run the GMSInstaller app.

4. Select “One-click to install Google Services

5. After the Google services are downloaded and installed,
Open the Remix OS Settings app
and go to Applications,
Find the “Manager Applications” option,
and then choose “All

6. Scroll down until you see Google Play Services, select it, and
click the “Manage space” link,
and click the “Clear All Data” option on the next screen.

7. Find Google Google Services Framework the same way,
and this time just click the “Clear Data” button.

8. Reboot Remix OS.

Enjoy, Google Play Store on Remix OS for PC


Note: You may need to update Google Play Services form Play Store,

 Google Play Servies Download links:

 Google Play Store  ||  Apk Mirror   


Download Remix OS:

  Download Remix OS for PC   


.


New 'Remix OS'  for PC Released


The Next Evolution of Android PC

Built on the Android-x86 project, Remix OS for PC unlocks our next phase of development for Remix OS and introduces a whole new range of versatility to how and where you can Remix.


Redefining PC mobility:


With Remix OS for PC, you can also conveniently house Remix OS on a USB stick. That means you can literally bring your Remix experience wherever you go. With most computers in the world powered by x86 chipsets, you should have no trouble finding the right hardware to run Remix OS.


Limitless Multitasking:

Why restrict yourself to only one or at most two apps running side by side? Remix OS 2.0’s multi-window support means you can spend less time switching between screens and more time multitasking. That means you can work on a presentation in Office, conduct research on Browser, and receive a call from your mother on Skype – all at the same time.


# System Requirements:
  • A USB 3.0 flash drive that supports FAT32 format, with a minimum capacity of 8GB and a recommended writing speed of 20MB/s.
  • A CPU with 64-bit compatibility.


# Instructions to launch 'Remix OS'  for PC
  • Download Remix OS for PC package and then unzip the file.
  • Plug in a USB flash drive into your preferred PC.
  • Run the Remix OS USB Tool and follow the instructions to burn the .iso file onto your USB flash drive.
  • Reboot your PC.
  • Press 'F12' (PC) or the 'Option' (Mac).
  • Select "USB Storage Device" as boot option.
  • Select either "Guest Mode" or "Resident Mode" to start Remix OS for PC.


# Download Remix OS  v2.0.102:


Remix OS for PC Beta Version  (64-bit)

UEFI Boot & Legacy BIOS compatible

(Size: 717MB)

 Download Here  ||  Torrent   


Remix OS for PC Beta Version  (32-bit)

Legacy BIOS only

(Size: 562MB)

  Torrent


Official Website:
www.Jide.com


Search Tags:
How to Install Android Remix OS on Your PC
New 'Remix OS'  for PC Released (Android OS)

.


Kali NetHunter 3.0 Android Mobile Penetration Testing Platform Released

NetHunter has been actively developed for over a year now, and  has undergone nothing short of a complete transformation since its last release. We’ve taken our time with v3.0, and the results are a complete overhaul of the NetHunter Android application, with a more polished interface and a fully functioning feature set.

Through the amazing NetHunter community work led by  binkybear, fattire, and jmingov, we can now proudly look at NetHunter and confidently consider it to be a stable, commercial grade  mobile penetration testing platform. And so, we are really excited with todays release of NetHunter 3.0


What’s New in Kali NetHunter 3.0

NetHunter Android Application Rewrite
The NetHunter Android application has been totally redone and has become much more “application centric”. Many new features and attacks have been added, not to mention a whole bunch of community-driven bug fixes. The NetHunter application has finally reached maturity and is now a really viable tool that helps manage complex attacks. In addition, the application now allows you to manage your Kali chroot independently, including rebuilding and deleting the chroot as needed. You can also choose to install individual metapackages in your chroot, although the default selected kali-nethunter metapackage should include all the bare necessities.

NetHunter Linux Root Toolkit Installer
We’ve got a new official NetHunter installer that runs natively on Linux or OSX. The installer is made from a set of Bash scripts which you can use to unlock, flash to stock and install the NetHunter image to supported OnePlus One or Nexus devices. Please welcome the NetHunter LRT, created by jmingov.

Android Lollipop and Marshmallow Support
Yes, you heard right. NetHunter now supports Marshmallow (Android AOSP 6.x) on applicable devices – although we’re not necessarily fans of the “latest is best” philosophy. Our favourite device continues to be the OnePlus One phone due to the combined benefits of size, CPU/RAM resources, as well as Y-Cable charging support.

New Build Scripts, Easier Integration for New Devices
Our rewrite also included the code that generates the images, completely porting it to Python and optimizing the build time significantly. The build process can now build small NetHunter images (~70MB) that do not include a built-in Kali chroot – allowing you do download a chroot later via the Android application.

We’ve also made it much easier to build ports for new devices that NetHunter can run on and we’ve already seen a couple of interesting PRs regarding Galaxy device support.


Fabulous NetHunter Documentation
We might be somewhat biased regarding our documentation, and perhaps it’s not “fabulous” but just “good” but still, it’s definitely much better than it was before and can be found in the form of the NetHunter Github Wiki. We’ve included topics such as downloading, building and installing NetHunter, as well as a quick overview of each of the NetHunter Attacks and Features.


NetHunter 3.0 Screenshots:


Kali Linux NetHunter v3.0 Downloads

Image Name              Download    Size             Version
OnePlus One CM 12.1 ZIP or Trnt 0.6G 3.0
Nexus 4 Lollipop ZIP or Trnt 0.6G 3.0
Nexus 5 Marshmallow ZIP or Trnt 0.6G 3.0
Nexus 5 Lollipop ZIP or Trnt 0.6G 3.0
Nexus 6 Marshmallow ZIP or Trnt 0.6G 3.0
Nexus 6 Lollipop ZIP or Trnt 0.6G 3.0
Nexus 7 2012 Lollipop ZIP or Trnt 0.6G 3.0
Nexus 7 2013 Marshmallow ZIP or Trnt 0.6G 3.0
Nexus 7 2013 Lollipop ZIP or Trnt 0.6G 3.0
Nexus 10 Marshmallow ZIP or Trnt 0.6G 3.0
Nexus 9 Lollipop ZIP or Trnt 0.6G 3.0
Nexus 10 Lollipop ZIP or Trnt 0.6G 3.0


>>  Downloads Page  << 


.


Android Studio v1.2.2

Android Studio is a extensive development environment which helps programmers to write, debug, test and emulate android applications. It is an Integrated Development Editor which is developed by Google for the android platform. This software contains all the necessary tools which a programmer needs in order to design and test the android apps.

This software also surrounds the Gradle Engine, with which the tasks are automated and it allows you more streamlined workflow with customized builds. The interface of this software is very much like IntelliJ having some small differences. Its GUI is communicating and it offers quick actions and manipulation of code. It has a set of Lint tools which can be used to test the versions compatibility. Apart from this Android Studio benefits you from the static code analysis, this helps you to identify bugs and perform in-depth analysis. In the end it can be said that Android Studio is a steady and very trustworthy IDE which surrounds the Android specific features.


Features of Android Studio
  • It’s a useful Integrated Development Editor for Programmers.
  • It lets you write, debug, test and emulate you android apps.
  • It has an efficient interface and very helping GUI.

 Download Android Studio

 Download Here  ||  Download Here 


.


Nox App Player

New and Best Way Ever to Play Mobile Games on PC
Nox App Player is a free Android emulator dedicated to bring the best experience for users to play Android games and apps on PC.


Check out what’s new in Version 3.0:
  •     New and Best Way Ever to Play Mobile Games on PC
  •     Highest Performance | Extreme Compatibility | Eclipsing All Traditional Emulators
  •     Open and Mutual Benificial Cooperation
  •     Leading Technology and User Resource to Assist Partners Fast Development
  •     Best Game Experience
  •     Games of High Quality | Easy Controlling | Smoothest Entertainment
  •     New Generation of Kernel
  •     Based on Android 4.4.2 | X86/AMD Compatible | Worldwide Leading Performance


Features:
  • Developed on Android 4.4.2 kernal –
    Similar to other Android Emulator, Nox App Player is built on a custom virtual machine, but it is developed on Android 4.4.2 kernel. Higher compatibility is therefore deemed possible since many of the new games/apps are developed to keep up with higher Android version. The software adopts the UI of physical Android phones and tablets so upon start, there’s little need for learning as long as you know how to operate a physical smartphone.
  • Google Play store integrated –
    Google Play Store is a must have for android phones as well as for android emulators. With it integrated upon installation, users simply download an app of their choice and experience the smooth running.
  • Compatible to run on Windows 10 –
    Nox App Player runs smoothly on Windows 10 computers. Considering that Windows 10 was just released at on 29th July, this is really a fast move. It shows the Nox develop team’s efficiency and tested developing ability.
  • Support input/out put devices, gamepad and controller –
    Keyboard typing, camera and microphone integration are basic functions of Nox App Player. What made using Nox App Player special is that you can connect gamepad and controllers in a game.
  • Multiplayer mode which could be activated with ease –
    The multiplayer mode is an innovative feature which makes it possible for users to run several Nox App Player window at the same time.


Downloads:

   Download Here   ||  Download Here  


Nox Android App Player Tricks:

Clash of Clans players:
If you have difficulty downloading or updating Clash of Clans in Nox 3.0,
simply change Nox resolution to Phone:
    720 x 1280   as shown in the screenshot below
and it will do the magic.


.

Windroye 2.9.0 Android Emulator


If you are looking for the light emulator of Android for PC.
Windroy is more than just an emulator. It’s a full porting of the Android operating system to Windows. This means that it is much faster than other emulators such as Bluestacks when it comes to running apps. The Windroy interface is exactly the same as the Android interface system on most Android devices. It integrates with many Windows applications such as Flash and Windows Media Player.


System Requirements:
  • Processor: Intel Pentium 1.6GHz CPU
  • RAM: 1 GB
  • Free Space needed: 500 MB disk space
  • Operating System: Windows XP, Vista, Windows 7, Windows 8 32/64 bit


Downloads:

  Download Here  ||  Download Here  


.


AMIDuOS 2.0.4 PRO Android Emulator

AMIDuOS is a revolutionary new concept that brings the functionality, depth and fun of the Android experience to Microsoft® Windows devices. It runs on nearly any Windows 7,8 or 10 PC or tablet device for fast, easy switching between Windows and Android environments - without the need to dual boot!

Run Android Apps in Windows® 7/8/10 with AMIDuOS™

Features:

Full Android Experience:
AMIDuOS is nothing less than the full Android experience, with all the features that the latest version of the popular mobile operating system has to offer. It runs fast, looks crisp and sharp and performs with no limitations – because it is 100% native Android running on your Windows hardware!

  
Application Compatibility:
AMIDuOS can run nearly all of the Android applications available in Android app markets. To get you started, it comes with preloaded Amazon Appstore. To make AMIDuOS your own, simply add your favorite Android app markets with the AMIDuOS package installer. AMIDuOS is also ARM v7 compatible, so it can run most popular ARM applications as well.

Performance:
AMIDuOS supports 3D acceleration, so you can enjoy a superior Android gaming experience in Windows. It uses Windows OpenGL drivers for improved frame rates to support even the most graphics-intensive games. Applications run mainly in the native x86-mode to provide peak performance, while ARM emulation is only performed on as-needed basis. This helps AMIDuOS to save power and extend battery life to the fullest.

Device Support:
While AMIDuOS leverages device drivers from Windows™ to enable near-native performance in Android, it also supports key peripherals and sensors of the Windows hardware, including high-definition cameras, audio and microphone. Sensor support includes Ambient Light, Accelerometer, Gyrometer, Compass and Orientation - giving you the full Android tablet/mobile experience.

Tablet Features:
AMIDuOS provides a complete Android tablet experience with multitouch and gesture support like Pinch and Zoom, along with a full-featured software keyboard. It also supports Compass and GPS functionality, allowing map navigation by multitouch.

Desktop Features:
In Desktop mode AMIDuOS offers full hardware keyboard support, including keyboard shortcuts. The screen orientation can be changed to portrait mode for applications that require it. AMIDuOS also supports Ethernet and simulated WiFi to provide network access for Android applications.

Storage and File Sharing:
File sharing between Windows and Android is also supported in AMIDuOS, so you can share pictures, videos and music between both OS modes with ease. AMIDuOS also supports SD card emulation and allows you to configure the SD card size with an easy-to-use configuration tool.


AMIDuOS Tricks:

Note: It does not comes with built-in Google Apps. But you can download it from here  “GoogleApps.zip

How To Install Google Apps
  •     Install and activate AmiDuOS
  •     Download “GoogleApps.zip” from below [Don't Open]
  •     Right click on it and select “Apply To DuOS
  •     Start AmiDuOS & Install Google Apps

How To Root AmiDuOS
  • Turn off AmiDuOS
  • Open AmiDuos Configuration Tool, Go to Advanced tab, Tick Root Mode and Apply
  • Download and Extract AmiDuOS Rooter From The Links Given Below
  • Start AmiDuOS
  • Go to Settings> About Phone and Click Build number 7 times
  • Now, Go back to settings and open developer options
  • Enable USB Debugging
  • Now, Opoen the Folder in which Root zip is Extracted
  • Run AmiDuOS Rooter and Wait Till it finish
  • AmiDuOS Will Restart once the process is complete
  • Open SuperSU App
  • It’ll ask for binary update, Click Update and choose normal recovery
  • AmiDuOS will restart and You’ll Get Root Access

How To Crack:
  • Download and extract zip contents to a folder
  • Start installation with “DuosInstaller.exe” [Do not Open]
  • Download “AmiDuOS Crack.zip” and extract to a folder
  • Copy and replace “DuOS.exe” from crack folder to installation directory
  • Done.

Official Website:
 www.Amiduos.com 


Downloads:

AMIDuOS Offline Setup:
 AmiDuOS 2.0.4 Pro (x64) Setup

Crack File:
 AmiDuOS 2.0.4 Pro (x64) Crack


.


Andy Android Emulator For Windows & MAC


ANDY - THE ANDROID EMULATOR
  • Provides seamless sync between desktop and mobile devices
  • Connects Win/Mac with Android apps for launching, push notifications and storage
  • Enables app download from any desktop browser direct to Andy OS
  • Ensures most up to date Android OS at all times
  • Brings your favorite communication and entertainment mobile apps to the desktop

What does Andy Do:

Andy breaks down the barrier between desktop and mobile computing, while keeping a user up to date with the latest Android OS feature upgrades. It also provides users with unlimited storage capacity, PC and Mac compatibility, and the freedom to play the most popular mobile games on a desktop. With phone as a joystick, you will never have to sacrifice the multi-touch or gyro elements of gaming, and thanks to seamless connection between desktop and mobile, you can receive a SnapChat phone picture on the street and see it on your desktop at home or just download whatsapp for pc.


Official Website:

 www.Andyroid.net


www.Andyroid.net/faqs 

 FAQ

 Advanced Optimization guide 


Download Andy Android Emulator

  Download Here Andy v45.5 


For Root:

 Andy Rootkit v3.5   

.

Bluestacks v2 Released:
Run Multiple Android Apps On Windows


All New December Bluestacks Update:

Though BlueStacks 2 only came out last week, we have been working constantly to improve our product for your use! This release includes some exciting new features and some major fixes to popular apps. See below for some of the most notable changes:


Screen Re-sizing:
One of the most asked for features has arrived! Drag and resize the App Player window from the bottom right corner to your exact preferences.

Android Notification Bar:
This feature has made its return in BlueStacks 2. Now, you can view and keep up-to-date with all of your notifications and messages from every app. Pull down the status bar for an expanded view. This will be especially useful if you leave your BlueStacks running all day and want a quick way to read through what you may have missed.

Zoom-In and Zoom-Out Support:
The zooming feature present in many apps has been optimized, play games like Angry Birds, Sim City BuildIt, Castle Clash, and over 100 more in this release edition.

App Fixes:
Temple Run 2, Subway Surfer, Zynga Poker, and many more apps have gone through a major fix for black hole patching.


Download Official Bluestacks 2 Version:

   Download Here   ||   Download Here  


# Bluestacks 2 MODDED:

# BlueStacks App Player Pro v2.0.2.5623 + MOD


MOD Features
:
  • Simple Launcher Interface
  • SuperUser Support
  • SuperSu Support
  • Import Windows Files directly from your PC to bluestacks
  • Root Explorer Support
  • Advanced Calculator Support
  • Clock, Camera, and other accessories support
  • Root Checker Support
  • Build in Media Player which run mp3, mp4 and many other formats easily
  • Many more

Downloads:

  Download Here   ||   Download Here     

(Size: 283 MB)  


Bluestacks Tricks:


# How to Root BlueStacks 2 using KingRoot
  • First download BlueStacks 2
  • Once you have downloaded it, install it carefully. Use this installation guide for help.
  • Now download KingRoot APK
  • Once its downloaded, double click KingRoot APK and it will start installing on your BlueStacks 2.
  • Now open KingRoot app from the app drawer of BlueStacks 2.
  • Now click the Android logo at the center of the screen in this app. It will automatically start rooting your device.
  • Once it’s done, restart your BlueStacks 2.
  • That’s it. You have successfully rooted your BlueStacks 2. You can download Root Checker from Play Store and verify if its rooted or not.

How to Change KingRoot to SuperSU in BlueStacks 2
  • Now that you have successfully rooted your BlueStacks 2 and want to change KingRoot to SuperSU, then download Super-Sume APK
  •  Once its downloaded, double click the APK of Super-Sume and it will start installing on your BlueStacks 2.
  • Once it’s done, open it from the App Drawer of BlueStacks 2.
  • There is a big blue button on this app. Tap on it and it will ask you to allow root access. Click on Allow button and proceed further.
  • Now once again tap the button
  • It will automatically uninstall KingRoot and all its apps. After that it will install SuperSU.
  • It will automatically open SuperSU.
  • Now you have successfully rooted BlueStacks 2 and have a SuperSU to use all the rooted apps on your BlueStacks 2.
This guide is not absolute; rooting from KingRoot app works but when it comes to changing from KingRoot to SuperSU.

Root Apk Download:

 KingRoot Apk  


For Old Version:
>> Bluestacks Old Version <<


.


BlueStacks Android App Player For Windows

BlueStacks is an easy to use yet powerful software solution designed to run Android apps right on your Windows machine, with the help of a Google account.

Simple-to-handle GUI:
Boasting a very effective emulation engine, BlueStacks impresses thanks to its user-friendly approach, making everything easy as pie for all types of users, be they beginners or with a bit more computer knowledge. It looks exactly like the mobile platform, with all the proper buttons incorporated in the main window.

Once installed, you are required to input your existing Google account or create a new one, so that you can gain access to the Play Store.

Access, download and manage apps with ease
It is possible to download all games and apps available on Android from the Play Store, as well as play them with ease. You can navigate the Internet with the help of a built-in web browser, as well as check out your Twitter and Facebook account.

The app is available on a full-screen mode, while you can also make it smaller with just a click of the button. As stated above, the back, home and recent apps buttons are available, and help you easily browse through all the options offered with ease, and all installed items are going to create shortcuts in the Start screen (on Windows 8 and 8.1).

Tweak parameters and share items:
Loading times are very good and the program runs with absolutely no errors. Most of the games, galleries and apps can be controlled by mouse, just like you would do on your typical touchscreen mobile phone.

Aside from that, you can share an item on Facebook and Twitter with great ease, view the time in a corner, enable or disable notifications and access the settings panel. The latter is quite familiar, seeing its design is almost identical with the Android one, and lets you manage sound, apps and contacts, as well as set date and time, change keyboard options and language.

Sync phone and PC, and import files:
Another feature that's worth mentioning is the so-called Cloud Connect, a separate tool designed to allow users to automatically sync their apps, updates, photos and SMS from your Android phone to the PC.

In turn, you can also import items from your computer’s hard drive with just a click of the button, with the incorporated file browser.

Performance and conclusion:
This utility runs all Windows versions out there, without putting a strain on the computer’s performance. The response time is good and the interface is intuitive and quite familiar for those who already have an Android phone.

Overall, BlueStacks is an effective piece of software that brings the flavor of Android apps on your computer.

HomePage:
 www.bluestacks.com


# BlueStacks App Player Without Root:

 BlueStacks 0.9.24


# BlueStacks App Player With Root


 BlueStacks 0.9.23-1
(Pre-rooted with SuperSU)


OR

 BlueStacks 0.9.23-2
(Pre-rooted with SuperUser)


# BlueStacks App Player Pro v2.0.2.5623 MOD

MOD Features:
  • Simple Launcher Interface
  • SuperUser Support
  • SuperSu Support
  • Import Windows Files directly from your PC to bluestacks
  • Root Explorer Support
  • Advanced Calculator Support
  • Clock, Camera, and other accessories support
  • Root Checker Support
  • Build in Media Player which run mp3, mp4 and many other formats easily
  • Many more
  Download Here    (Size: 283 MB)  


BlueStacks App Player Tricks:


# How to Run Speed Up BlueStacks:
  • Press Start Button with “R” Key
  • Search the regedit in newly opened windows
  • Click on HEKY_LOCAL_MACHINE > SOFTWARE
  • Then select Bluestacks > Android > Hit enter on Memory and replace 300 to 600
    then click on decimal and click “OK”
  • That’s it; you will have successfully speed up your bluestacks

# How to Root BlueStacks:

Steps to Make BlueStacks Rooted

Step 1:
  • Unhide all hidden folder by going to control panel > folder options
Step 2:
  • Launch BS Easy Tool and click on RegEdit option
  • Now set memory option as half of your installed memory in your PC or Laptop
Step 3:
  • Click on RootEZ and click on Autodetect From BlueStacks
  • Then click on following options given in image
Step 4:
  • Click on Proceed button and wait for a few seconds or may be more
  • After successful root; you will see the successful message on screen
  • You have done and successfully rooted bluestacks

BS Easy ToolKit v3.5 (92 MB)

 Download Here   


.

 Download WhatsApp for PC with Bluestacks:


You can download many applications like WhatsApp Messenger etc on the Google Play Store with the help of BlueStacks.


## How to Running WhatsApp on PC :
First of all, you need to download Bluestacks in Windows PC or Mac.


Bluestacks Website


BlueStacks Offline Download Links:

  Bluestacks Download Here
(Without Root)


OR

  Download Bluestacks Here
(Pre-rooted with SuperSU)


  and Install it on your pc. After installing Open it.

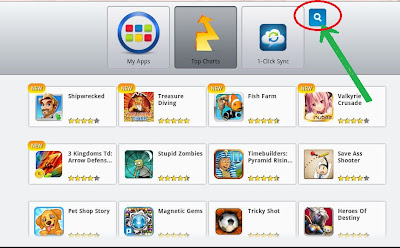
# Now Open the Application You can Find the Screen Capture Just Like Below Picture


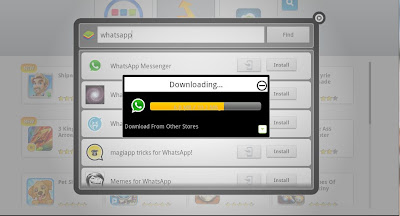
> Now Click on Search icon and search for Whatsapp


> Now choose the whatsapp messenger form any market .its your wish.


> Just click and Download whatsapp after selecting from any
app store


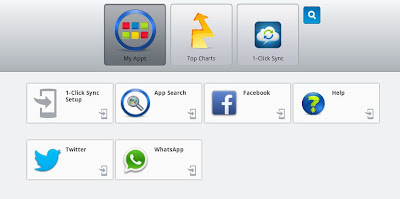
> You can find downloaded app in My Apps.


OR

 Download Whatsapp

> Now click on WhatsApp fill the Details and Start using it.

# Problem with App Player for Surface Pro solved!
If you're having issues with touch response,


click this link:

Win8 Reg File

Click "Yes" to all prompts, restart your Surface and it will work great!
Enjoy,

# Import Contacts From PC To WhatsApp:

 
1) Create a contacts file in Excel.

2) Need to convert Excel sheet to V-Card. V-Card will have .vcf as its file extension. Then convert Excel to.vcf and save those contacts.

3) Open BlueStack application. One more important thing is you need to install file manager application on BlueStack along with WhatsApp.

4) Go To 'C' Drive ---> Program Data
 If you didn't see Program Data don't worry it was hidden. Make sure that folder options should be in 'Show Hidden Files'.

5) Now Program Data > BluStacks > UserData > Shared Folder
Then remove all the folders if have any. Then upload your contacts (V-Card .vcf File).

6) Open File Manager application on BlueStack then Go To > My Files > SdCard > bstfolder
then add every contact file(.vcf) manually.

OR
Backup Your Contacts Using Android Mobile

Android Mobile > Contacts > Option > Export To Sd Card > 0001.vcf

Then Copy & Past in

C:\ProgramData\BlueStacks\UserData\SharedFolder

[[ Past Here ]]

.

Author Name

{picture#https://instagram.fbom1-2.fna.fbcdn.net/t51.2885-19/s150x150/17662158_221658868312088_138323287238246400_a.jpg} Hi, I am Swapnil Zambare. I love to explore Computer and Internet. My aim is to spread tips and tricks related to Hacking, Computer, Android phones, Blogging, SEO, Social networks and many mores all over the world for free so that every one can enjoy our Premium Services for Completely Free. {facebook#https://www.facebook.com/SwapnilTech} {twitter#https://twitter.com/swapnilzambare7} {google#YOUR_SOCIAL_PROFILE_URL} {pinterest#YOUR_SOCIAL_PROFILE_URL} {youtube#YOUR_SOCIAL_PROFILE_URL} {instagram#https://www.instagram.com/theswapnilzambare/}

Contact Form

Name

Email *

Message *

Powered by Blogger.