Articles by "Windows Tricks n Tips"

Showing posts with label Windows Tricks n Tips. Show all posts


How to Connect Two Laptops Using Wifi

# Setting for Laptop - 1

  • Go to My Computer and Open its Properties.
     
  • Note:  If You are a Windows OS User then Go to My Computer > Properties > Advanced System settings
  • Navigate to Computer Name tab and Select Change and Rename the Computer Name to ‘Laptop-1’ and Tick WORKGROUP and Give it any name as shown below in the Image.


  • Now Go  Network Connections.
  • Start > Control Panel > Network and Internet > Network and Sharing Center – Change Adapter Settings.
  •  Next Open ‘Wireless Network adapter’ Properties.
  • Now Navigate to the ‘Wireless Network Tab’ and There Select Advanced Button and then Select  Computer to Computer (Ad-Hoc) connection.
  • Click on Add Preferred Networks and Provide the Following Details.
Network name (SSID) – WiFi
Network Authentication – Open
Data Encryption – Disabled

  • Now You need to Configure your TCP/IP Settings to Assign the IP Address to the Laptop.
  • Open Your Network Adapter Settings and Go to Properties and Select Internet Protocol Version 4 and Provide the Following IP Address as shown below in the Image.

IP Address – 192.168.1.1
Subnet Mask – 255.255.255.0
Default Gateway – 192.168.1.2


  • Click OK and You are all Done.


# Setting for Laptop - 2

  • Go to My Computer and Open its Properties.
  • Note: If You are a Windows OS User then Go to My Computer > Properties > Advanced System settings
  • Navigate to Computer Name tab and Select Change and Rename the Computer Name to
    Laptop-2’ and Tick WORKGROUP and Give it any name.
  • Now Go  Network Connections.
  • Start > Control Panel > Network and Internet > Network and Sharing Center – Change Adapter Settings
  • Next Open ‘Wireless Network adapter’ Properties.
  • Now Navigate to the ‘Wireless Network Tab’ and There Select Advanced Button and then Select  Computer to Computer (Ad-Hoc) connection.
  • Click on Add Preferred Networks and Provide the Following Details.

Network name (SSID) – WiFi
Network Authentication – Open
Data Encryption – Disabled

  • Now You need to Configure your TCP/IP Settings to Assign the IP Address to the Laptop.
  • Open Your Network Adapter Settings and Go to Properties and Select Internet Protocol Version 4 and Provide the Following IP Address as shown below in the Image.

IP Address –  192.168.1.2
Subnet Mask –  255.255.255.0
Default Gateway –  192.168.1.1


  • Note: Carefully Enter the Above Details Remember the IP Address should be different for both the Laptops.
  • Click OK and You are all Done.
  • Now Open Your Network Adapters and Connect. Also You can Use Map Network Drive to Share the Files or Folder.


Note:  You must Give all the Permissions From the Windows Firewall for allowing to Share the Files and Folders therefore some time it becomes difficult to Connect Laptops using the Above method.


Connect 2 Laptop Using LAN Cable:
How to Connect Two Computers via LAN Cable

.


How to Connect Two Computers via Cable
(Fast Data Transfer)

PC 1 Settings:
  • Go to "Open Networking and Sharing Center".
  • Click on "Local Area Connection".
  • Now click on "Properties".
  • Double click on "Internet Protocol Version 4(TCP/IPv6)".
  • Click on "Use the following IP address:" and enter the IP address: as 192.168.1.20 and just give a click on Subnet mask. Once done click "Ok" and close it.

PC 2 Settings:
  • Go to "Open Networking and Sharing Center".
  • Click on "Local Area Connection".
  • Now click on "Properties".
  • Double click on "Internet Protocol Version 4(TCP/IPv6)".
  • Click on "Use the following IP address:" and enter the IP address: as 192.168.1.21 and just give a click on Subnet mask. Once done click "Ok" and close it.

Now two computers are connected.
To share files we need to give access to our drives, so follow the commands given below to give access to your drivers.
  • Click on "Computer".
  • Right click on any driver (D/E/F) and then Properties.
  • Click on "Sharing" tab and then Advance Sharing and then check out Share the folder
  • Click on Permissions to give control on the other PC and once done click "Ok" and close it
  • Click Security and then go onto Advance Settings & Change Permissions & Add & Advance & Find Now at bottom click Everyone.
Now PC 2:
Run >   \\192.168.1.20  (PC 1 ip) > Enter > Done ((You will get PC 1 share Driver))

then Copy & Past any files. (**Full Control permission Required)


Note: If you share your data via WiFi the data transfer will be 1-2MB and if you share the data via Lan cable the data transfer will be 10-12MB


Connect Two Computers using Wifi:
How to Connect Two Laptops Using Wifi

.


Transfer Data From Android To PC/Laptop Using WIFI

Sync Features:
• Send files to computer (and vice versa) without USB data cable (without external network support)
• Data transfers in private (local) Wi-Fi network (easy, secure, fast and no data plan impact)
• Transfer speed up to 300Mb/s
• Compatible with Windows Explorer and other FTP client tools (such as FileZilla)


Steps To Transfers Data From Android Phone To PC
  • First of all you have to an same WiFi network connection on computer or your android phone.
  • Then simply Download the Software Data Cable app from Google Play Store.

     Download Here
  • Install the app in your Android phone and click on Start Service.


  • Then it will show you  ftp://192.168.1.5:8888  address,
    Simply copy the address or fill into your computer address bar and click OK.
    It will show you storage folder where your all files stored now you can transfers the data from your android phone to computer or vice verse.


# Similer Wifi File Sharing Android Apps:

 SHAREit 

 WifiDroid  

 Wireless File Transfer

 WiFi File Transfer


.


How To Make Your Computer Welcome You at Startup

Step 1:
First of all, click on start and then type Notepad and then press enter. Open the notepad.

Step 2:
Now in notepad copy and paste the below code:-


Dim speaks, speech speaks=”Welcome to your PC, Swapnil” Set speech=CreateObject(“sapi.spvoice”) speech.Speak speaks


In the place of the user name you can put your own name and anything you want a computer to speak. You can put your name so that every time you open up your computer you will hear a welcome note with your name.


Step 3:
Now save this as Welcome.vbs to your desktop. You can put any name as per your choice. You can replace Welcome and put your name, but “.vbs” is unreplaceable.


Step 4:
Now copy the file and paste in the
C:Documents and SettingsAll UsersStart MenuProgramsStartup (in Windows XP)

and to

C:\Users {User-Name}AppData\Roaming\Microsoft\Windows\StartMenu\Programs\Startup
(in Windows 8, Windows 7 and Windows Vista) if C: is your System drive.


Now every time you start your computer a welcome voice will tune by your computer.


#SwapnilTech


Microsoft Adding User-Tracking Tools To Windows 7 And 8

Microsoft has been criticized by privacy advocates in regards to the data hunger of its Windows 10 operating system. The operating system slurps data like there is no tomorrow, especially when systems are set up using the express settings.

Experienced users may disable telemetry and data collection partially during setup, and then some more afterwards using the Registry or Group Policy.
  • Update KB3068708 which replaces KB3022345 adds the Diagnostic and Telemetry tracking service. (The service "collects diagnostics about functional issues on Windows systems that participate in the Customer Experience Improvement Program".)
  • Update KB3075249 "adds telemetry points to the User Account Control (UAC) feature to collect information on elevations that come from low integrity levels. "
  • Build KB3080149 "updates the Diagnostics and Telemetry tracking service to existing devices".


Microsoft Lists two host names in KB3068708 that data is received from and sent to:

  • vortex-win.data.microsoft.com
  • settings-win.data.microsoft.com


How to Remove:

You may remove those updates using the Control Panel, or by running the following commands using an elevated command prompt:

    wusa /uninstall /kb:3068708 /quiet /norestart
    wusa /uninstall /kb:3022345 /quiet /norestart
    wusa /uninstall /kb:3075249 /quiet /norestart
    wusa /uninstall /kb:3080149 /quiet /norestart


Use Windows Privacy Deactive Tools:

>> Use Windows Privacy Tools  <<

.

How To Fix 'The Hosted Network Couldn’t Be Started' in Windows


Method 1:
  • Open 'Device Manager' and click on 'View' > 'Show Hidden Devices'
  • Now navigate to 'Network Adapters' and browse to 'Microsoft Hosted Network Virtual Adapter'
  • Right click on it and choose 'Enable'
Now the hosted network is connected.


Method 2 :
  • Go To Control Panel > Select 'System and Security'
  • Then 'System' > 'Device Manager'
OR
  • Open Run and type devmgmt.msc and hit enter.
  • Now 'Device Manager' window will open.
    • Select and expand the Network adapters from the list of devices.
  • Now Find your wireless network adapter and right-click on it and select 'Properties'


Note : If your Wi-Fi adapter is not listed in the device manager you might need to restart your computer. The below 2 next steps are not really required, what you need to do is to enable your device now.
  • Select the 'Power Management' tab.
  • Make sure Under the 'Power Management' tab, the following option is checked (enabled):

    Allow the computer to turn off this device to save power
     
  • If not just Enable it and click ok.
# Now restart your PC and try sharing your Wi-Fi. In most cases this steps will fix the problem.


.  

FIX "We couldn't complete the updates Undoing changes Don't turn off your computer" Error in Windows 10


Windows 10 Update KB3081424 Causing Endless Reboot Loop

Microsoft has rolled out a cumulative update for Windows 10 KB3081424 that contains security fixes. The Update was actually meant to fix several issues related to VPN, Cortana, AMD Drivers, Explorer stability and other fixes so as to enhance the stability of the operating system. But, the users are reporting issues while installing this update for the new Operating system who tried to install that update on their devices caused endless reboot issue.
You can now Download KB3081424 Windows 10 Update.
It downloads and starts reboot to install. The updates gets installed to some percent and again reboots. The same thing repeats and lastly it shows “Something went wrong so uninstalling the update.” The issue is mainly caused by invalid user SID entries in the Windows Registry. This way the updates are not installed properly and here is the solution to fix this issue.


How to Fix this Issue?


Method 1:

Follow the below steps to fix the issue using Windows Registry.

Note:
It is recommended that you create a System Rrestore Point or backup before making changes to your Windows registry.

  • Initially, Press Windows + R key that opens RUN window.
  • Type regedit in the box and click OK.
  • It then redirects to a new window Registry Editor in which you need to navigate through the following Registry KEY.
    HKEY_LOCAL_MACHINE\SOFTWARE\Microsoft\Windows NT\CurrentVersion\ProfileList
  • Navigate using the above key wherein you find list of all user profiles that exist on the machine.
  • The entries S-1-5-18, S-1-5-19 and S-1-5-20 are used by the system and they must be left alone.
  • If you have more than one i.e., S-1-5-21* entry, this must be removed by right clicking on that and click on Delete so that you may be able to fix the issue.
  • Click on each profile starting with S-1-5-21 to link it to a user account on the system.
  • You can do so by looking at the Profileimagepath value after selecting the account.
  • Make sure you do not delete the admin profile.
  • Delete the keys of all selected accounts and then Restart the computer.

In this way you can fix the Windows 10 KB3081424 update issue. Try the above process and fix the issue. If it works then it would be fine, or else, if you wish, you can restore your computer back to the created System Restore Point.


Method 2: (Hide KB3081424 Update)

How to temporarily prevent a Windows or driver update from reinstalling in Windows 10

To uninstall an unwanted Windows Update:
  • Type “View Installed Updates” in the Search box and then click on View Installed Updates – Control Panel from the Search results.
  • To uninstall the unwanted update, select it from the list and then click Uninstall.

Hide Updates:
 

To temporarily prevent the driver or update from being reinstalled until a new driver or updated fix is available, a troubleshooter is available that provides a user interface for hiding and showing Windows Updates and drivers for Windows 10. You can obtain and run the "Show or hide updates" troubleshooter by downloading it from the Microsoft Download Center.

Download & Run:
Download "Show or hide updates" Troubleshooter

 
The KB 3081424 update was the third Windows 10 update and the previous two also caused problems. The first update automatically installed new drivers that caused issues for people that have multiple monitor setups and Nvidia graphics cards.
The second update which is known as KB 3074681 caused the Windows Explorer file system to crash repeatedly for many users.


Method 3:

Troubleshoot Problems with installing updates

Here are solutions to some common problems with installing updates.
You might be able to automatically fix some problems by running the Windows Update Troubleshooter

More Info


# Disable Windows Updates:

>>  Disable Auto Windows Updates & Auto Restart


.

How to Boot Into Safe Mode In Windows 10


1. Use the System Configuration Tool:

Goto:
Run > msconfig  > OK

Go to the Boot tab and, in the Boot options section check the box  "Safe boot".
Then, click or tap OK.


Click Restart Or Exit without Restart depending on whether you want to restart now or later.


2. Use Shift + Restart

Press Start Menu > Power button at the Windows login screen or in the Power Menu
Then, Press and hold the SHIFT key on your keyboard and click Restart.
( Shift Key + Restart )


Windows asks you to choose an option:
Select Troubleshoot  > Advanced options > Startup Settings

You are informed that you are about to restart in order to change several Windows options, including enabling Safe Mode. Press Restart.

Your computer or device restarts again and displays nine startup settings, including Safe Mode, Safe Mode with Networking and Safe Mode with Command Prompt

Press the F4 key on your keyboard, to enable Safe Mode,
F5 to enable Safe Mode with Networking and
F6 to enable Safe Mode with Command Prompt.


3. Safe Mode using Command Prompt (CMD)

>> Open an Command prompt.

Start
(Right Click) > Command prompt (Admin) > Yes.

# To Start Windows 10 in Normal Mode:


bcdedit /deletevalue {current} safeboot


# To Start Windows 10 in Safe Mode:

bcdedit /set {current} safeboot minimal


# To Start Windows 10 in Safe Mode with Networking:

bcdedit /set {current} safeboot network


# To Start Windows 10 in Safe Mode with Command Prompt:

bcdedit /set {current} safeboot minimal


Then
bcdedit /set {current} safebootalternateshell yes


## Enter to instantly Restart the Computer:

shutdown /r /t 00


4. To Add "Safe Mode" to Desktop Context Menu

1. Download the file below.

Add_Safe_Mode_to_Desktop_Context_Menu.zip

2. Save the .zip file to your desktop, and Extract it.

3. Open the Extracted Folder
Add_Safe_Mode_to_Desktop_Context_Menu.reg  file and  Safe_Mode folder to your desktop.

4. Move the Safe_Mode folder into the C:\Windows folder

5. If prompted, click on Continue and Yes  to approve.

6. Double click/tap on the extracted Add_Safe_Mode_to_Desktop_Context_Menu.reg file to merge it.

7. If prompted, click on Run, Yes , Yes, and OK to approve.


.

Create System Restore Point in Windows 10


Steps:
  • Open the Win+X Power User Tasks Menu, click/tap on System.
OR
  • This Pc (My Computer) Icon > Right click > Properties
  • Click/tap on the System protection link on the left side.
  • Make sure that you have System Protection turned on for all drives that you want included in the restore point.
  • When ready to create a restore point, click/tap on the Create button.


  • Type a description you want to help you identify the restore point.
    The current date and time are added automatically. Click/tap on Create when finished.


  • Windows System Protection will now create a restore point.


  •  When successfully created, click/tap on Close it.
  •  Done

.

Add Desktop Gadgets to Windows 10

Method 1:

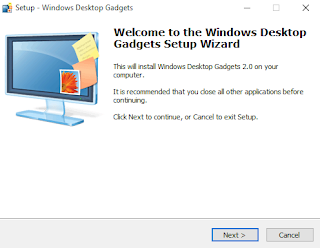
Windows Desktop Gadgets


Windows Desktop Gadgets is a free solution that will help to bring back the Windows 7 desktop gadgets that you loved to modern versions of Windows, including Windows 10.

 >>   Download Windows Desktop Gadgets Installer 

Installation is quick and easy.

  
  Add More Gadgets: click on Get more gadgets online & Download it.


Method 2:

8GadgetPack


Just like the above software, 8GadgetPack is another free application to install gadgets in Windows 10. Although 8GadgetPack was developed for Windows 8/8.1, it’s compatible with Windows 10 as well.

>>  Download 8GadgetPack 

Download and install 8Gadgetpack to see a sidebar containing your favourite desktop gadgets. A total of 45 gadgets are installed when you install 8GadgetPack, including clock, calendar, currency, clipboarder, custom calendar, app launcher, and all CPU meter. This one also adds gadget options to desktop context menu and is very easy to use.


.

Create a Windows 10 USB Bootable Flash Drive


Method 1:
Create Bootable USB using Rufus


Step 1: Download  the latest version of  Rufus.
Rufus is a portable utility and hence doesn’t require an installation.

Step 2: Connect your 4GB+ USB drive to your PC where you have installed Vista, Windows 7, Windows 8, Windows 8.1 Or Windows 10 Be sure to backup all data from your USB drive.

Step 3: Run Rufus utility.

Step 4: Change All Settings & Then select the disc icon next to the ISO dropdown and navigate to the location of your official Windows 10 ISO.


Step 5: Finally, click Start button, click OK button when you see the warning dialog to continue its job.


Downloads:

 Rufus Tool 


Method 2:
  • Browse to the downloaded ISO in Windows Explorer, right click the file and choose Mount
    OR Open as Windows Explorer
  • Select all files/folders using the mouse or CTRL+A , right click on the highlighted area and choose Copy (or CTRL+C)


  • Open you (empty) USB disk in Explorer and right click the white space and choose Paste (or CTRL+V)

The next thing for you to do is to modify the USB disk for booting. Up until now, it’s still only a non-bootable USB Windows 10 installer.
  • Go back to the command prompt window you shouldn’t have closed
  • Type the following command  -

    k:\boot\bootsect.exe /nt60 g:
    and press return
    (Ensure you replace the k: and g: drive letters with your mounted ISO media and USB disk respectively)
  • Type Exit to close the command prompt window
All that you need to do now is remove the USB media from your computer, plug it into the device you wish to test Windows 10 on, and boot from it.

.

Windows 8 Charms Bar (Side Bar) in Windows 10


Steps:
1. First you'll need to install RocketDock utility for windows.

 Download RocketDock

2. Then Download following skin:

 Download Windows 8 Charms Bar Skin

Then Extract it, you'll get 3 folders:
  • Charmbar transparent
  • Icons
  • Settings

3. Now open RocketDock's folder present in Program Files.
You'll find RocketDock folder in following locations:

    C:\Program Files\RocketDock\ (for 32-bit Windows)
    C:\Program Files (x86)\RocketDock\ (for 64-bit Windows)

4. First copy "Charmbar transparent" folder to "RocketDock\Skins" folder.

5. Now copy "Icons" folder into "RocketDock" folder directly.
The "Icons" folder will already exist in RocketDock folder, replace it.

6. Now "Settings" folder. It contains 2 files "Settings.ini" and "Settingstransparent.ini".
Replace default "Settings.ini" file present in RocketDock's folder with this new one.

7. That's it. Now run RocketDock and get ready to enjoy Windows 8 Charms Bar in Windows 10.


PS: The extra "Settingstransparent.ini" file present in downloaded RAR file can be used to have a transparent background for Charms Bar instead of default black.
Simply rename "Settingstransparent.ini" file to "Settings.ini" and Replace the "Settings.ini" file present in RocketDock folder with this one.

NOTE: If a shortcut in RocketDock doesn't work for you, you can edit its Properties by right-click on the icon and select "Icon Settings" option and then edit the shortcut path mentioned in "Target" text box to the correct path according to your system.

EnJoy :)

.

How to Delete Windows.old Folder in Windows 10


Delete "Windows.old" Folder using Disk Cleanup

1. Press the Windows + R keys to open the Run dialog, type

   cleanmgr
 
   and click/tap on OK to open Disk Cleanup.

2. If you have more than one drive or partition on your PC, then select the Windows C: drive, and click on OK.


3. Click/tap on the Clean up system files button.


4. Repeat step 2 above.

5. Check the Previous Windows installation(s) box, and click on OK.


6. Click/tap on Delete Files to confirm.


7. When Disk Cleanup finishes, the C:\Windows.old folder will be deleted.


# Also Delete SoftwareDistribution Folder:
Navigate to C:\Windows\SoftwareDistribution\Download and delete whatever is inside this folder.


Note:
  • Be sure to copy any files that you may want out of the Windows.old folder before you delete it.
    Once deleted, they are gone.
  • If you delete the Windows.old folder, you will no longer be able to go back to a previous version of Windows.
  • You must be an administrator to be able to do the steps in this tutorial.

How to Speed Up Your Internet in Windows 10

Followed by the user, these tweaks can depict a significant impact on the speed of internet.
Tweak 1:
Drain out DNS Cache
When the internet users try to access a website, their ISP’s DNS Server provides them with an IP address, which is machine-readable information. The operating system stores this information at hidden places, on the user’s machine. This collection of information, called DNS Cache, can affect the speed of your internet. The smart way is to ditch out this unnecessary data to lower the burden on your browser.
  • Point your cursor to the upper-right corner of your Windows 8 Screen, to view the Charm bar
  • Click on the Search icon, on the Charm bar
  • In the search box, type CMD’ and click the Apps tile beneath the search box
  • In the search results, locate Command Prompt, right click on it then click Run as administrator from the menu at the bottom of the screen
  • Confirm your action by clicking Yes, if prompted
  • In the displayed black window, type IPCONFIG /FLUSHDNS’ and hit Enter
  • You have successfully deleted the DNS Cache
  • Close Command Prompt


Tweak 2:

Disable Unnecessary Services
Windows 8 has a property to automatically startup more services, as compared to Windows 7. These services usually consume an adequate level of memory to slowdown the speed of your internet. With the purpose to cut down the delay time in internet browsing, you can set these services to a manual startup status. The procedure of doing so is mentioned underneath.
  • On your Windows 8 Desktop screen, press Windows key + R to open Run box
  • Type ‘services.msc’ and hit Enter, to open the Services window
  • Double click the services that you need not to start automatically
  • Set Manual against Startup type
  • Press OK to save changes and exit
The specified services that are not utilized by the mainstream users are Diagnostic Policy Service, Distributed Link Tracking Client, Offline Files, Performance Logs & Alerts, Program Compatibility Assistant Service, Secondary Logon, Windows Error Reporting Service, Windows Image Acquisition (WIA).


Tweak 3:

Reset WinSock
WinSock defines the path to your Windows network software to access network services. Resetting the Internet Protocols would also reset the WinSock Catalog, in result of which, your internet speed may elevate to an extent. To experience it, do as directed.
  • Point your cursor to the upper-right corner of your Windows 8 Screen, to view the Charm bar
  • Click on the Search icon, on the Charm bar
  • In the search box, type CMD’and click the Apps tile beneath the search box
  • In the search results, locate Command Prompt, right click on it then click Run as administrator from the menu at the bottom of the screen
  • Confirm your action by clicking Yes, if prompted
  • In the displayed black window, type ‘NETSH INT IP RESET C:\RESETLOG.txt’ and hit Enter
  • Close Command Prompt


Tweak 4:

Update Network Card Driver
The hardware intermediating amongst the user PC and the Network is called LAN (Local Area Network) Adapter or LAN Card. To guarantee your network and internet speed, you must incorporate the correct and up-to-date drivers for this piece of hardware.
  • Identify the Make and Model of your LAN Adapter
  • Go to the manufacturer’s website
  • Search for your model in the drivers update area
  • Download and Install the concerned utility
An alternative way to update your LAN drivers is described as under.
  • Point your cursor on the upper-right corner of your Desktop screen, to view Charm bar
  • In the Charm bar, click on the Search icon
  • In the Search box, type ‘device manager’, and select Settings, underneath
  • In the search results, click to open the Device Manager
  • In the Device Manager window, locate Network adapters
  • Click to drop down Network adapters, to view your LAN hardware
  • Right click your hardware, and choose Update Driver Software
  • Choose Search automatically for updated driver software
  • Windows will automatically search for latest drivers and install them for you
  • Exit Device Manager
  • Reboot your Computer


Tweak 5:

Disable Bandwidth Reserves

Windows Os has the ability to reserve a portion of connection bandwidth for the use of some live applications. By default, it reserves 20 percent of the total bandwidth. You can disable this policy and witness the gain in the speed of your internet connection.
  • On your Windows OS Desktop screen, press Windows key + R to open Run box
  • Type ‘gpedit.msc’ in the run box, and hit Enter to open Local Group Policy Editor
  • On the left pane of GP Editor, navigate to and select QoS Packet Scheduler, via following path
Local Computer Policy\Computer Configuration\Administrative Templates\Network\QoS Packet Scheduler
  • On the right pane, locate and select Limit reservable bandwidth entry
  • Double click this entry to Edit it
  • In the new window, straightaway reduce the percentage of Bandwidth limit to "0"
  • Click OK to confirm
  • Exit Local Group Policy Editor


An alternative way to perform this procedure is through Windows registry. Please recite the following text.
  • Press Win + R on your keyboard to open Run box
  • Type regedit.exe in the run box and hit Enter to open Registry Editor
  • In the left panel of Registry Editor, navigate through HKEY_LOCAL_MACHINE to reach:
  • SOFTWARE\Policies\Microsoft\Windows
  • Under Windows key, locate a sub key with the name Psched.
  • If the doesn’t exist, right click Windows key and select New to create a Key
  • Name this newly created key as Psched
  • Now right click Psched key to create a New DWORD Value
  • Name this value as NonBestEffortLimit
  • Double click this newly created value to Modify
  • In dialog box choose Decimal as Base and put a desired number (from 1 to 100) as Value data
  • Exit Registry Editor and Restart your computer
Any number you put in value data would represent the percentage of reserved bandwidth.
Sometimes, it is not your internet connection with a slowdown activity but your system might need other improvements.


# How to Delete Temporary Files from Temp Folder
  • Log on to Windows 10 computer with the account that has the elevated privileges.
  • Click Desktop tile from the Start screen to go to the desktop window.
  • Once on the desktop screen, press Windows + R keys simultaneously to initiate the Run command box.
  • On the Run command box, type %TEMP% in the available field and press Enter.
  • On the opened Temp window, press CTRL + A keys simultaneously to select all the files.
  • Once selected, press Delete to remove all the temporary files.
  • Close Temp window when done.

.


Windows Screen Recording Softwares
   
Windows Screen recording software can be useful when you want to show a project or some informational video on  a presentation or even record a game to share your game play with your friends and family..

1.CamStudio

CamStudio is used widely for recording screen and capturing. You can even enable or disable your mouse cursor, record sounds from software or a microphone. You can even select your screen pixel to be recorded or a selected program window so that the rest won’t be recorded in your desktop.


2. Microsoft Expression Encoder 4

Expression Encoder is an advanced audio/video-encoding and live-broadcasting application especially suited for generating content that takes full advantage of the rich graphic and interactive capability of Microsoft Silverlight playback scenarios. You can also generate Windows Media video and audio files that are optimized for other web playback scenarios, or appropriate for playback on portable devices.

3. Jing

Jing allows you to capture video, animation and images and share them on internet. In jing we can create short keys to make things quicker. You can record and selected Window or region that you would like to record in Jing

4.Ezvid

Ezvid is a screen recording software with an in-built video editor where you can split your recordings and you can add text and slip your recordings and create a slideshow effect and speed control. Using this software you can upload your video directly to YouTube.

5.Screenr

Unlike other software screenr has nothing to do with you computer or install on your computer. It is a free online tool where you can record your screen without installing any software on online. It requires Java and you can record upto 5mins maximum.

6. Rylstim Screen Recorder

Rylstim Screen Recorder is simple software that just records your screen after you hit “Start Record” This software does’nt record input device like microphone. Rylstime is a free software and you can even get a paid version too. This software is useful for people who are lazy on configuring their settings.

7.FRAPS

FRAPS is widely used by gamer’s to record game play. Fraps can capture audio and video upto 7680×4800 with custom frame rates from 1 to 120 fps (Frames per second). In Fraps we have hotkeys to record screen. It also used for recording movies at great quality.

8.Camtasia Studio

Camtasia studio best paid software for screen recording or screen capturing. You can even import videos, music, photos and customize according to your need. You can even export your video or upload your video directly to YouTube.

9. Webinaria

Webinaria is a open source software for screen recording and screen capturing. Using this software you can create Flash(AVI to FLV) recordings of your desktop, record microphone with your presentation or demo and even save or edit your recordings to add voice, webcam or text.

10.Icecream Screen Recorder

Icecream screen recorder a free tool to record your screen as a screenshot or a video. Easy to use and can record Skype video in HD and record webinars and games. In 3 ways to explain this is easy,simple and useful tool.

11.ActivePresenter 

Active Presenter is similar to other screen recording softwares. You  can add voice, call-outs, annotations, videos and graphics. You can export your video to website,desktop,mobile device.

.

Create WiFi Hotspot in Windows OS

WiFi Hotspot For Windows 8.1/8/7 using Command Prompt


How to create WiFi hotspot network without using any software’s within 2 minutes by using your command prompt in Windows 7 or Windows 8.1/8

Step 1:
First you need to know that whether your PC hardware supports hotspot feature or not. To check this follow the instructions.

Open your command prompt in administrative mode (if you don’t know this post your comment I will tell you) Enter this command

             netsh wlan show drivers 


>> If it show “yes” as you can in image you can create WiFi hotspot in your PC.
Go ahead you’re almost done. If it shows No you PC can’t create hotspot.
Don’t close your command prompt until i say close it because we need it again.

Step 2:
  • Enter the below command (your CMD must be open in administrative mode). The Past following Command
netsh wlan set hostednetwork mode=allow ssid=SwapnilTech key=SwapnilHaxoR

  • Hit enter then you will see like in below image.If you see image like below then your doing right.Now your hotspot is activated in your PC.


Here SwapnilTech is your WiFi name and SwapnilHaxoR is your password. You can change your password if you want.

Step 3:
This is to switch on the created WiFi network Again Enter the below command.

netsh wlan start hostednetwork
Press Enter >> Now you will see the command prompt as below.
Now can close your CMD if you want. your hotspot is created you can see it in your other devices.


Step 4:
This is to share internet connection with other devices.
  • Click on windows button in your keyboard .
  • Then type Network and sharing as shown in below image
  • click on settings there highlighted with yellow then click on the red marked option.

The virtual wireless adapter is now started and shown in the Network and Sharing Center.


You can connect all your devices to the newly created wireless network. However, it has no Internet access. If you stop at this point, when you connect other devices and computers to the newly created access point, you can create a network between them and use it to share files and resources.

# Allow Internet Access For The Devices That Are Connected To The Virtual WiFi Network

Open the Network and Sharing Center. Notice that the virtual network adapter you just created is displayed as active, but it has no Internet access at this time.


Click or Tap the connection of the physical network adapter that currently has Internet access. In our case, it is an Ethernet connection.


This opens the Status window for the selected network adapter. Click or tap Properties.

     
In the Properties window, go to the Sharing tab.


In order to give Internet access to the virtual WiFi adapter that was created earlier, check the box near "Allow other network users to connect through this computer's Internet connection".

Then, select the virtual adapter that was created earlier.


Click or tap OK and Close to save the settings you've made.
Go back to the Network and Sharing Center and you will notice that the virtual network adapter now has Internet access.


The virtual adapter now gives Internet access to all the devices that are connected to it.


# How To Fix "The Hosted Network Couldn’t Be Started" in Windows

Steps:
  • Open “Device Manager” and click on “View” >> “Show Hidden Devices”
  • Now navigate to “Network Adapters” and browse to “Microsoft Hosted Network Virtual Adapter”
  • Right click on it and choose “Enable”.
  • Now the hosted network is connected.
  
Then Try Step 2 & 3

Enjoy Wifi Hotspot without Software.
.

Author Name

{picture#https://instagram.fbom1-2.fna.fbcdn.net/t51.2885-19/s150x150/17662158_221658868312088_138323287238246400_a.jpg} Hi, I am Swapnil Zambare. I love to explore Computer and Internet. My aim is to spread tips and tricks related to Hacking, Computer, Android phones, Blogging, SEO, Social networks and many mores all over the world for free so that every one can enjoy our Premium Services for Completely Free. {facebook#https://www.facebook.com/SwapnilTech} {twitter#https://twitter.com/swapnilzambare7} {google#YOUR_SOCIAL_PROFILE_URL} {pinterest#YOUR_SOCIAL_PROFILE_URL} {youtube#YOUR_SOCIAL_PROFILE_URL} {instagram#https://www.instagram.com/theswapnilzambare/}

Contact Form

Name

Email *

Message *

Powered by Blogger.