Latest Post

Ultimate Windows Tweaker 4 for Windows 10


Quickly tweak Windows 10 for better performance, security and accessibility

The Windows Club has released Ultimate Windows Tweaker 4.0 for Windows 10 users. The lightweight, portable freeware tool makes it easy to tweak various aspects of Windows that usually hidden away or require access to Registry editor or Group Policy Editor. The latest build of Ultimate Windows Tweaker comes with over 200 tweaks which is an increase of 20 percent over the Ultimate Windows Tweaker 3.1.2, Like its predecessors, it’s a portable tool.

Ultimate Windows Tweaker 4:


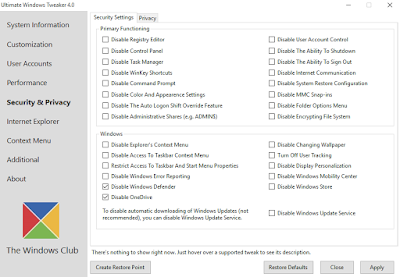
The program divides up its many tweaks into seven sections: Customization, User Accounts, Performance, Security & Privacy, Internet Explorer, Context Menu and Additional Tweaks. Each section then divides up its numerous tweaks into clearly defined tabs. Select one of these and make sure you click Create Checkpoint before you start experimenting so you’ve got a System Restore point to roll back to if necessary.
Most of the tweaks make sense just tick the box to enable one, select an option from the drop-down menu or use a slider to change timings. You can add useful shortcuts to right-click menus, tweak hidden parts of Windows and fine-tune your system for better performance.


Download Link:
 Download Here


.

Windows 10 - Upgrade Installation


Windows 10 Free Upgrade Offer:
If you’re running Windows 7 SP1 or Windows 8.1 Update, in most cases, you’ll be able to keep your Windows settings, personal files, and most apps when you upgrade to Windows 10. During the upgrade, setup will let you know if there’s anything that’ll be removed—but it’s always a good idea to back up your files before you start upgrading.

Windows 10 System Requirements:
  • OS: Windows 7 OR Windows 8.1
  • Processor: 1 gigahertz (GHz) or faster
  • RAM: 1 gigabyte (GB) (32-bit) or 2 GB (64-bit)
  • Hard disk space: 16 GB
  • Graphics card: Microsoft DirectX 9 graphics device with WDDM driver
  • Display: 800x600 screen resolution
  • Internet access to activate
  • Click Here for More Details


>>  Download Windows 10 For Free


To Upgrade to Windows 10 with an ISO file:
  • Windows 8, 8.1, or 10, mount the ISO file.
  • Windows 7, you will need to Extract the files in the ISO to a new folder on your desktop, open the folder.
  • Open Bootable Windows 10 USB / DVD

Windows 10 Upgrade Steps:
  • Run the Setup.exe file to start Windows 10 Setup


  • Windows 10 Setup will now start preparing.
  • Select  Download and install updates OR Not Right Now, and click on Next.


  • Windows 10 Setup will now start getting things ready.


  • Click on Accept for the license terms.


  • Windows 10 Setup will now check for and install any available updates.
  • Windows 10 Setup will now check compatibility to make sure you're ready to install.


  • When ready, click on Install to start upgrading to Windows 10


  • If you would like to change what you keep in the upgrade, then click on the Change what to keep link, choose what to keep, click on Next,


  • Windows 10 Setup will now start upgrading Windows.


NOTE: During the installation process, your screen may flash and computer will restart a few times.
  • When ready, click on Next.
  • When you reach this point, click on Use Express settings OR Customize settings for how you want to set these settings,


# Click on Customize settings

  • Turn On or Off the Personalization and Location settings you would like, and click on Next. (Turn Off Everything)


  • Turn On or Off the Browser and protection and Connectivity and error reporting settings that you want, and click on Next.
    (Turn Off Everything)

 
  • Windows will now check for an Internet connection.

 
  • Click on Next

(Wait for Sometime)
Windows 10 is Ready to use

  • Make sure that you have the correct time zone, date, and time set.


If you like, you could use Disk Cleanup to delete the Windows upgrade log files, Previous Windows installation, and Temporary Windows installation files items to free up the large amount of space that they take on your hard drive.

This step will delete the C:\$Windows.~BT and C:\Windows.old folders.


# Also Delete SoftwareDistribution Folder:

> Navigate to C:\Windows\SoftwareDistribution\Download and delete whatever is inside this folder.


If you delete the Windows.old folder, you will no longer be able to go back to a Previous version of Windows.

>>  How to Delete Windows.old Folder in Windows 10 

.

Transparent Command Prompt in Windows 10


New features on Command Prompt in Windows 10
  • The Command Prompt gets several architecture update. Since Windows Vista, all console functionality has lived in this single conhost executable. The primary function of Conhost.exe now is to load either a DLL containing the original console or one that contains our new code.
  • The Command Prompt windows can now go full-screen 80 characters wide was just fine. You can grab the edge and pull the console window wider. Clicking on the Maximize button will make it go full-screen.
  • Word wrap has been.
  • Click-and-drag selection will understand and select line by line. If you need to select in block mode, simply hold down the ALT key when starting a selection.
  • Improved keyboard editing and selection
  • Text selection and editing keys introduced
  • The quick-edit mode enabled by default.
  • Console windows can now be semi-transparent.


# Make CMD transparent in Windows 10:

Start (Right Click) > Command Prompt (Admin) > Right-click on the title bar and select Properties.


Under the Colors tab,
You can set the transparency by moving the slider. The minimum opacity allowed is 30%. Using this setting, you can make the console window semi-transparent.


.

Fix No wireless (WiFi) networks are available after you upgrade from Windows 8.1 to Windows 10


After you upgrade from Windows 8.1 to Windows 10, no wireless networks are listed as available. This is true even though the wireless network adapter seems to function correctly. If you restart the computer or you try to reinstall the wireless network adapter driver, this does not fix the problem.

This problem may also prevent wired Ethernet connections from functioning correctly. This affects connections that are made through either a built-in Ethernet adapter or a USB Ethernet adapter.

“This issue may occur if older VPN software is installed on Windows 8.1 and is present during the upgrade to Windows 10. Older software versions contain a Filter Driver (the Deterministic Network Enhancer) which is not properly upgraded, leading to the issue.”  -Microsoft

How to fix No Wi-Fi Available in Windows 10:

Method 1:  (Automatic fix)

To fix this issue automatically, follow these steps:
  • Download the  Troubleshooter
  • When you are prompted, tap or click Open.
  • Note If you receive a security prompt, select Yes to start the troubleshooter.
  • In the window that opens, follow the instructions to run the troubleshooter.

Method 2  (Manual fix)

To fix this issue manually, follow these steps:
  • Open an administrative Command Prompt window.
  • Run the following commands:

    reg delete HKCR\CLSID\{988248f3-a1ad-49bf-9170-676cbbc36ba3} /va /f
     
  • Now enter this command, and press Enter once more:

    netcfg -v -u dni_dne

  •  Restart Computer.


 Method 3: 

If this does not work for you, Create a  System Restore Point  and then
  • Start (Right Click) > Run > regedit >OK  (to open the Registry Editor)
  • Navigate to the following registry key:

    HKEY_CLASSES_ROOT\CLSID\{988248f3-a1ad-49bf-9170-676cbbc36ba3}
  • If it Exists, Delete it.
# It basically does the same thing as the ‘reg delete‘command,


## Restart your computer and check back with your Wi-Fi settings.
All networks around you should now be visible and you should be able to connect to them easily.

.

How To Fix 'The Hosted Network Couldn’t Be Started' in Windows


Method 1:
  • Open 'Device Manager' and click on 'View' > 'Show Hidden Devices'
  • Now navigate to 'Network Adapters' and browse to 'Microsoft Hosted Network Virtual Adapter'
  • Right click on it and choose 'Enable'
Now the hosted network is connected.


Method 2 :
  • Go To Control Panel > Select 'System and Security'
  • Then 'System' > 'Device Manager'
OR
  • Open Run and type devmgmt.msc and hit enter.
  • Now 'Device Manager' window will open.
    • Select and expand the Network adapters from the list of devices.
  • Now Find your wireless network adapter and right-click on it and select 'Properties'


Note : If your Wi-Fi adapter is not listed in the device manager you might need to restart your computer. The below 2 next steps are not really required, what you need to do is to enable your device now.
  • Select the 'Power Management' tab.
  • Make sure Under the 'Power Management' tab, the following option is checked (enabled):

    Allow the computer to turn off this device to save power
     
  • If not just Enable it and click ok.
# Now restart your PC and try sharing your Wi-Fi. In most cases this steps will fix the problem.


.  

Fix Microsoft Update Error Code 0x80080008 while installing Windows Updates

Windows Update receive the following error message:

There were some problems installing updates, but we'll try again later. If you keep seeing this and want to search the web or contact support for information, this may help: (0x80080008)

Windows Update:


How to Fix Windows 10 Update Error 0x80080008
Method 1:

First, run the Microsoft Fix it.
Fix the problem with Microsoft Windows Update that is not working
http://go.microsoft.com/?linkid=9830262

This option Shows “Service Registration is missing or corrupt”.


Method 2:

Also, follow these steps to start the Windows Update service
Start (Right Click) > Command Prompt (Admin) > Yes

net start bits

&

#Re-register
Windows Update server:

  • Stop the Windows Update service:
    net stop wuauserv
  • Type the following to re-register the concerned DLL file:
    regsvr32 %windir%\system32\wups2.dll
  • Finally, restart the Windows Update service:

    net start wuauserv

## This helps resolve your issue.


Method 3:

Open Command Prompt (Admin)

SFC /SCANNOW

This finished successfully and found no errors.


Method 4:

Open Notepad, copy this into it and save it as a  WinUpdateFix.bat  file on Desktop.

REGSVR32 WUPS2.DLL /S
REGSVR32 WUPS.DLL /S
REGSVR32 WUAUENG.DLL /S
REGSVR32 WUAPI.DLL /S
REGSVR32 WUCLTUX.DLL /S
REGSVR32 WUWEBV.DLL /S
REGSVR32 JSCRIPT.DLL /S
REGSVR32 MSXML3.DLL /S

After running this batch script, it finished with no visible errors. Then reboot


Method 5:

Start a Command prompt in administrator mode and use this command:

dism.exe /online /cleanup-image /restorehealth

Let it finish running, then reboot and try updates again.


.

Author Name

{picture#https://instagram.fbom1-2.fna.fbcdn.net/t51.2885-19/s150x150/17662158_221658868312088_138323287238246400_a.jpg} Hi, I am Swapnil Zambare. I love to explore Computer and Internet. My aim is to spread tips and tricks related to Hacking, Computer, Android phones, Blogging, SEO, Social networks and many mores all over the world for free so that every one can enjoy our Premium Services for Completely Free. {facebook#https://www.facebook.com/SwapnilTech} {twitter#https://twitter.com/swapnilzambare7} {google#YOUR_SOCIAL_PROFILE_URL} {pinterest#YOUR_SOCIAL_PROFILE_URL} {youtube#YOUR_SOCIAL_PROFILE_URL} {instagram#https://www.instagram.com/theswapnilzambare/}

Contact Form

Name

Email *

Message *

Powered by Blogger.