Latest Post


How to Download APK Files from Google Play Store to PC
Google Play Store, by default, doesn’t allow the download of APKs for free games and apps stored there and it installs the requested app or game on the device directly. If you want to download and install the APK files for certain games and apps from Play Store on your Android device using your computer, then there are some solutions which let you download APK files from Plays Store right on your PC.

After downloading the APK files on your computer, you can then install the APK files on your Android phone or tablet using any Smartphone manager or by directly transferring the APK file to your device using any connectivity medium like USB connectivity data cable or BlueTooth.


How to Download APK with Online APK Downloader:
  • In the Box labelled “Package name OR Google Play URL” Enter either the Google Play URL or Package name of the app which you want to download.
  • No Click on the Blue-colored “Generate Download Link” button, The App will be fetched and A Green button to Download the App/apk will appear below the Blue “Generate Download Link” button.
  • Click on Green button (Download button)
  • Save It.
APK Downloader Websites:

1.
Evozi.com 


                          http://apps.evozi.com/apk-downloader/ 


2. Downloader-apk

http://downloader-apk.com/
  

3. Apk-dl.com 

http://apk-dl.com/


4. Apkleecher.com 


5. Freeapk.ru 


# Download Offcial Android Apps Latest Updates
Without Google Play Store:


>>  www.apkmirror.com


Download Apk from Google Play without Device ID - Online Apk Downloader

Enjoy.. :D

.


How to Connect Two Laptops Using Wifi

# Setting for Laptop - 1

  • Go to My Computer and Open its Properties.
     
  • Note:  If You are a Windows OS User then Go to My Computer > Properties > Advanced System settings
  • Navigate to Computer Name tab and Select Change and Rename the Computer Name to ‘Laptop-1’ and Tick WORKGROUP and Give it any name as shown below in the Image.


  • Now Go  Network Connections.
  • Start > Control Panel > Network and Internet > Network and Sharing Center – Change Adapter Settings.
  •  Next Open ‘Wireless Network adapter’ Properties.
  • Now Navigate to the ‘Wireless Network Tab’ and There Select Advanced Button and then Select  Computer to Computer (Ad-Hoc) connection.
  • Click on Add Preferred Networks and Provide the Following Details.
Network name (SSID) – WiFi
Network Authentication – Open
Data Encryption – Disabled

  • Now You need to Configure your TCP/IP Settings to Assign the IP Address to the Laptop.
  • Open Your Network Adapter Settings and Go to Properties and Select Internet Protocol Version 4 and Provide the Following IP Address as shown below in the Image.

IP Address – 192.168.1.1
Subnet Mask – 255.255.255.0
Default Gateway – 192.168.1.2


  • Click OK and You are all Done.


# Setting for Laptop - 2

  • Go to My Computer and Open its Properties.
  • Note: If You are a Windows OS User then Go to My Computer > Properties > Advanced System settings
  • Navigate to Computer Name tab and Select Change and Rename the Computer Name to
    Laptop-2’ and Tick WORKGROUP and Give it any name.
  • Now Go  Network Connections.
  • Start > Control Panel > Network and Internet > Network and Sharing Center – Change Adapter Settings
  • Next Open ‘Wireless Network adapter’ Properties.
  • Now Navigate to the ‘Wireless Network Tab’ and There Select Advanced Button and then Select  Computer to Computer (Ad-Hoc) connection.
  • Click on Add Preferred Networks and Provide the Following Details.

Network name (SSID) – WiFi
Network Authentication – Open
Data Encryption – Disabled

  • Now You need to Configure your TCP/IP Settings to Assign the IP Address to the Laptop.
  • Open Your Network Adapter Settings and Go to Properties and Select Internet Protocol Version 4 and Provide the Following IP Address as shown below in the Image.

IP Address –  192.168.1.2
Subnet Mask –  255.255.255.0
Default Gateway –  192.168.1.1


  • Note: Carefully Enter the Above Details Remember the IP Address should be different for both the Laptops.
  • Click OK and You are all Done.
  • Now Open Your Network Adapters and Connect. Also You can Use Map Network Drive to Share the Files or Folder.


Note:  You must Give all the Permissions From the Windows Firewall for allowing to Share the Files and Folders therefore some time it becomes difficult to Connect Laptops using the Above method.


Connect 2 Laptop Using LAN Cable:
How to Connect Two Computers via LAN Cable

.


How to Connect Two Computers via Cable
(Fast Data Transfer)

PC 1 Settings:
  • Go to "Open Networking and Sharing Center".
  • Click on "Local Area Connection".
  • Now click on "Properties".
  • Double click on "Internet Protocol Version 4(TCP/IPv6)".
  • Click on "Use the following IP address:" and enter the IP address: as 192.168.1.20 and just give a click on Subnet mask. Once done click "Ok" and close it.

PC 2 Settings:
  • Go to "Open Networking and Sharing Center".
  • Click on "Local Area Connection".
  • Now click on "Properties".
  • Double click on "Internet Protocol Version 4(TCP/IPv6)".
  • Click on "Use the following IP address:" and enter the IP address: as 192.168.1.21 and just give a click on Subnet mask. Once done click "Ok" and close it.

Now two computers are connected.
To share files we need to give access to our drives, so follow the commands given below to give access to your drivers.
  • Click on "Computer".
  • Right click on any driver (D/E/F) and then Properties.
  • Click on "Sharing" tab and then Advance Sharing and then check out Share the folder
  • Click on Permissions to give control on the other PC and once done click "Ok" and close it
  • Click Security and then go onto Advance Settings & Change Permissions & Add & Advance & Find Now at bottom click Everyone.
Now PC 2:
Run >   \\192.168.1.20  (PC 1 ip) > Enter > Done ((You will get PC 1 share Driver))

then Copy & Past any files. (**Full Control permission Required)


Note: If you share your data via WiFi the data transfer will be 1-2MB and if you share the data via Lan cable the data transfer will be 10-12MB


Connect Two Computers using Wifi:
How to Connect Two Laptops Using Wifi

.


Transfer Data From Android To PC/Laptop Using WIFI

Sync Features:
• Send files to computer (and vice versa) without USB data cable (without external network support)
• Data transfers in private (local) Wi-Fi network (easy, secure, fast and no data plan impact)
• Transfer speed up to 300Mb/s
• Compatible with Windows Explorer and other FTP client tools (such as FileZilla)


Steps To Transfers Data From Android Phone To PC
  • First of all you have to an same WiFi network connection on computer or your android phone.
  • Then simply Download the Software Data Cable app from Google Play Store.

     Download Here
  • Install the app in your Android phone and click on Start Service.


  • Then it will show you  ftp://192.168.1.5:8888  address,
    Simply copy the address or fill into your computer address bar and click OK.
    It will show you storage folder where your all files stored now you can transfers the data from your android phone to computer or vice verse.


# Similer Wifi File Sharing Android Apps:

 SHAREit 

 WifiDroid  

 Wireless File Transfer

 WiFi File Transfer


.


Pokémon GO Game for Android & iOS

Venusaur, Charizard, Blastoise, Pikachu, and many other Pokémon have been discovered on planet Earth!
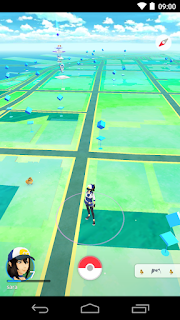
Now’s your chance to discover and capture the Pokémon all around you—so get your shoes on, step outside, and explore the world. You’ll join one of three teams and battle for the prestige and ownership of Gyms with your Pokémon at your side.

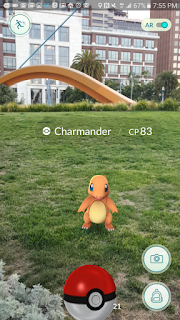
Pokémon are out there, and you need to find them. As you walk around a neighborhood, your smartphone will vibrate when there’s a Pokémon nearby. Take aim and throw a Poké Ball… You’ll have to stay alert, or it might get away!

Search far and wide for Pokémon and items
Certain Pokémon appear near their native environment—look for Water-type Pokémon by lakes and oceans. Visit PokéStops, found at interesting places like museums, art installations, historical markers, and monuments, to stock up on Poké Balls and helpful items.

Catching, hatching, evolving, and more
As you level up, you’ll be able to catch more-powerful Pokémon to complete your Pokédex. You can add to your collection by hatching Pokémon Eggs based on the distances you walk. Help your Pokémon evolve by catching many of the same kind.

Take on Gym battles and defend your Gym
As your Charmander evolves to Charmeleon and then Charizard, you can battle together to defeat a Gym and assign your Pokémon to defend it against all comers.

It’s time to get moving your real-life adventures await!

Notes:
- This app is free-to-play and offers in-game purchases. It is optimized for smartphones, not tablets.
- Compatible with Android devices that have 2GB RAM or more and have Android Version 4.4 - 6.0+ installed.
- Compatibility is not guaranteed for devices without GPS capabilities or devices that are connected only to Wi-Fi networks
- Not compatible with Android devices that use Intel Atom processors.
- Compatibility with tablet devices is not guaranteed.
- Application may not run on certain devices even if they have compatible OS versions installed.
- It is recommended to play while connected to a network in order to obtain accurate location information.
- Compatibility information may be changed at any time.
- Please visit www.PokemonGO.com for additional compatibility information.


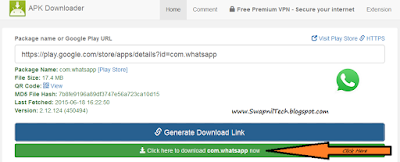
# Pokemon Go Apk: How to Download Pokemon Go for Android


Steps to Download Pokemon Go on Android:
  • On your phone go to Settings.
  • Tap on Security (also labelled as Privacy on some devices).
  • Go to Unknown sources.
  • Tap Allow for the installation of apps from unknown sources. This will allow you to install Pokemon Go.
  • On your phone, download Pokemon Go from here.
  • Now simply go to the Downloads folder on your phone and install it.

You can now play Pokemon Go on Android.


Download Pokemon GO for Android:

  Google Play Store  


 ApkMirror Store  (Direct Download)


  ApkPure  


# Pokemon Go iOS: How to Download Pokemon Go for iPhone, iPad

How to create a US account on iTunes:
  • Create a new Apple ID at this page.
  • Choose United States from the drop-down menu while creating your Apple ID.
  • On your iPhone open the App Store. Tap Featured on the bottom panel.
  • Scroll to the bottom and tap your Apple ID.
  • Tap Sign Out if you are already signed in.
  • Next, tap the Sign In button.
  • Key in your new Apple ID and password.
  • You'll see a pop-up that reads "This Apple ID has not yet been used in the iTunes Store". Tap Review.
  • Tap United States under COUNTRY OR REGION. Tap Next.
  • Read the terms and conditions and Apple's privacy policy and tap Agree.
  • Tap Agree again in the pop-up.
  • Under BILLING INFORMATION tap None.
  • Scroll down and key in a valid US address - search the Internet!
  • Key in a phone number. Then tap Next.
  • Tap Done on the top-right.


How to download and install Pokemon Go on iPhone
  • Now that you have a US account, just tap the Search button on the bottom panel.
  • Search for Pokemon Go or tap here.
  • Tap Get to download and install Pokemon Go on your iPhone.

Once you've installed the app, repeat steps 3 to 7 above to switch back to your primary Apple ID. The game will still work even after you switch the ID, although you will have to return to your US iTunes account to update the app.


Download Pokemon Go for iPhone, iPad:


 iTunes Store


Search Tags:
Pokémon GO APK,
Pokémon GO Game,
How to Download Pokemon Go on Android and iOS,
How to Download Pokemon Go on Android,
How to Download Pokemon Go on iOS,
Pokemon Go iOS: How to Download Pokemon Go for iPhone, iPad,
How to Download Pokemon Go APK, Install, and Play on Android


How to Remove Bloatware (Pre-Installed Apps) from Android Device


# Removing Bloatware Apps In Non Rooted Android

Some of the stock apps are there that mostly have of no use, so better is to remove them from your device as you can’t remove them as such.


Requirements:
The program requires that your manufacturer USB drivers are installed for your specific device as well as the following:
• Windows Operating System
• USB Debugging turned on for your device
• Root or KitKat and above running on your device


Steps:
  • First of all you need to enable developer option which you can enable by heading to
    Settings > About Phone -> Build Number
    (Tap on build number 7-10 times and your developer options will get activated)
  • Now you will see developer option in your settings and tap on it and scroll down and
    Enable  USB Debugging.

       
  • Now you need to download and install Debloater tool in your windows PC that will allow you to remove system apps from your device.
  • Now connect your android device with USB cable with your PC and wait for the tool to detect your device.
  • Now after the device is detected you will scan the apps that being currently installed in your device and that includes your system apps.
  • Now mark up the apps that you want to remove from your device and then you just need to click on apply button and this will block all those apps from your device and they will be no longer there in your device to consume your memory.

      
  • You can also undo this process by un-ticking them to access them again.
  • Thats it you are done, now all those apps will be removed mfrom your device and you device storage will be free from them.


# Removing Bloatware Apps In Rooted Android


# Using NoBloat App


ROOT REQUIRED !!!

NoBloat lets you delete unwanted apps that come pre-installed with your phone. Simply select the bloatware that you want to get rid of and click delete. NoBloat can automatically place backups on your external storage which you can restore at any time.


NoBloat features:
* Disabling and enabling system apps
* Creating backups of system apps and restoring them
* Deleting system apps
* Creating a blacklist of system app to delete
* Batch operation to backup/remove all blacklisted system apps
* Batch operation to enable all disabled system apps
* Batch operation to restore all backups
* Export your settings and blacklist to the external storage to import them later
* Quickly find apps using the search functionality
* Change backup folder location


 Download Here (FREE)   ||   Download Here (Paid)  


Author Name

{picture#https://instagram.fbom1-2.fna.fbcdn.net/t51.2885-19/s150x150/17662158_221658868312088_138323287238246400_a.jpg} Hi, I am Swapnil Zambare. I love to explore Computer and Internet. My aim is to spread tips and tricks related to Hacking, Computer, Android phones, Blogging, SEO, Social networks and many mores all over the world for free so that every one can enjoy our Premium Services for Completely Free. {facebook#https://www.facebook.com/SwapnilTech} {twitter#https://twitter.com/swapnilzambare7} {google#YOUR_SOCIAL_PROFILE_URL} {pinterest#YOUR_SOCIAL_PROFILE_URL} {youtube#YOUR_SOCIAL_PROFILE_URL} {instagram#https://www.instagram.com/theswapnilzambare/}

Contact Form

Name

Email *

Message *

Powered by Blogger.