Latest Post


Kali Linux OS

Our Most Advanced Penetration Testing Distribution, Ever.

After almost two years of public development (and another year behind the scenes), we are proud to announce our first point release of Kali Linux – version 1.1.0. This release brings with it a mix of unprecedented hardware support as well as rock solid stability. For us, this is a real milestone as this release epitomizes the benefits of our move from BackTrack to Kali Linux over two years ago. As we look at a now mature Kali, we see a versatile, flexible Linux distribution, rich with useful security and penetration testing related features, running on all sorts of weird and wonderful ARM hardware. But enough talk, here are the goods:
  • The new release runs a 3.18 kernel, patched for wireless injection attacks.
  • Our ISO build systems are now running off live-build 4.x.
  • Improved wireless driver support, due to both kernel and firmware upgrades.
  • NVIDIA Optimus hardware support.
  • Updated virtualbox-tool, openvm-tools and vmware-tools packages and instructions.
  • A whole bunch of fixes and updates from our bug-tracker changelog.
  • And most importantly, we changed grub screens and wallpapers!
                

Kali Linux Features:

Full Customisation of Kali ISOs

Full customisation of Kali ISOs with live-build allowing you to create your own Kali Linux images – Kali Linux is heavily integrated with live-build, allowing endless flexibility in customising and tailoring every aspect of your Kali Linux ISO images. Want a non-root user, KDE version of Kali with only the top 10 tools installed? We have a Kali Linux live build recipe for that!

Kali Linux ISO of Doom and Other Kali Recipes
The Kali Linux ISO of doom – a great example of the flexibility of live-build, and the types and complexity of customisations possible. Build a self installing, reverse VPN auto-connecting, network bridging Kali image – for the perfect hardware backdoor.
Kali Linux Live USB with LUKS Encrypted Persistence
Kali Linux Live USB persistence with LUKS encryption – Kali has extensive support for USB live installs, allowing for features such as file persistence or full (USB) disk encryption.
Kali Linux Live USB with Multiple Persistence Stores
Kali Linux Live USB with multiple persistence stores
– What’s more, Kali Linux supports multiple persistence USB stores on a single USB drive. You can create a live Kali USB bootable drive which supports encryption and multiple store profiles.

Kali Linux Full Disk Encryption
Kali Linux
LUKS Full Disk Encryption (FDE) – Having the ability to perform a full disk encryption of your sensitive penetration testing computer drive is an essential feature needed in our industry. Just the thought of unencrypted client data getting lost or mishandled is horrific.

Kali Linux LUKS Encryption Nuke
Nuking your Kali Linux hard disk with the
Kali LUKS nuke option – While being able to encrypt your drives is important, we believe it’s also important to be able to quickly control the destruction of data on these drives. Our Kali LUKS nuke feature is unique to our distribution.

Kali Linux Metapackages
Mastering Kali Linux tool sets with
Kali Metapackages – Kali contains a bunch of metapackage collections which aggregate different toolsets. This makes it easy to get custom, minimized environments set up. For example, if all you need are some wireless tools for an upcoming assessment, you can apt-get install kali-linux-wireless.

Kali Linux Amazon EC2 AWS Images
Kali Linux in the cloud –
Kali Amazon EC2 images available – Need to spin up a Kali box quickly? Perhaps you need some serious bandwidth or disk space for your upcoming tasks. You can easily set up a cloud version of Kali Linux in the Amazon Elastic Compute Cloud.

Kali Linux Accessibility Features
Kali Linux accessibility features for visually impaired users – Kali is one of the very few Linux distributions which have a working accessibility system for blind or visually impaired users through both voice feedback and braille hardware support.

Automating Kali Linux Deployment
Automating Kali Linux deployment via Unattended PXE installations – You can automate and customize your Kali Linux installations over the network. You are one PXE boot away from a fresh, custom Kali installation, or 10,000 of them.

Kali Linux on a Raspberry Pi and Other ARM Devices
Kali Linux on a Raspberry Pi
and a bunch of other interesting ARM devices
– Kali supports over a dozen different ARM devices and common hardware such as Raspberry Pi, Odroid, Beaglebone, and more. We’re very active in the ARM arena and constantly add new interesting hardware to our repertoire.

Kali Linux Forensics Mode
Kali Linux forensics mode
– The bootable “Forensics” mode available in Kali makes it perfect for forensics work, as the forensics Kali live image option does not mount any drives (including swap) with this option. The wealth of forensics tools on Kali (metapackage – kali-forensics-tools) makes Kali a good choice for any forensics work you need.

Kali Linux NetHunter
Kali Linux NetHunter ROM overlay for Nexus Android devices
– Kali is so versatile that creating the “Kali NetHunter” Android was a natural extension to our distribution. NetHunter is a custom Android ROM overlay for ASOP which brings together all the toolset of Kali Linux (and more!) to your Nexus or OnePlus phones.

Kali Linux Running on Android
Kali Linux running on Android through Linux Deploy
– Have a recent Android device other than a Nexus or OnePlus phone? Try using the Android App “Linux Deploy” to get Kali seamlessly installed in a chroot environment.

Disk Encryption on Raspberry Pi 2
and other ARM hardware
– There’s no easy way of having LUKS disk encryption on ARM hardware. We’ve simplified the process and gave it bells and whistles.


We generate fresh Kali Linux image files every few months, which we make available for download. This page provides the links to download Kali Linux in it’s latest release. For a release history, check our Kali Linux Releases page.


Downloads Links:
Kali OS  Direct      Torrent     Size                   Version
Kali Linux 64 bitISOTorrent3.0G
1.1.0a

Kali Linux 32 bitISOTorrent3.1G
1.1.0a

Kali Linux 64 bit miniISOTorrent28M
1.1.0a

Kali Linux 32 bit miniISOTorrent28M
1.1.0a

Kali Linux armelImageTorrent2.1G
1.1.0a

Kali Linux armhfImageTorrent2.0G
1.1.0a

>> Download Kali Linux VMware and VirtualBox images <<


Kali Linux NetHunter for Nexus and OnePlus

The Kali Linux NetHunter project is the first Open Source Android penetration testing platform for Nexus devices, created as a joint effort between the Kali community member “BinkyBear” and Offensive Security. NetHunter supports Wireless 802.11 frame injection, one-click MANA Evil Access Point setups, HID keyboard (Teensy like attacks), as well as BadUSB MITM attacks – and is built upon the sturdy shoulders of the Kali Linux distribution and toolsets. Whether you have a Nexus 5, Nexus 6, Nexus 7, Nexus 9, Nexus 10 or OnePlus One we’ve got you covered. Our freely downloadable images come with easy to follow installation and setup instructions to get you up and running in no time at all.


  • 802.11 Wireless Injection and AP mode support with multiple supported USB wifi cards.
  • Capable of running USB HID Keyboard attacks, much like the Teensy device is able to do.
  • Supports BadUSB MITM attacks. Plug in your Nethunter to a victim PC, and have your traffic relayed though it.
  • Contains a full Kali Linux toolset, with many tools available via a simple menu system.
  • USB Y-cable support in the Nethunter kernel – use your OTG cable while still charging your Nexus device!
  • Software Defined Radio support. Use Kali Nethunter with your HackRF to explore the wireless radio space.

 Download WhatsApp for PC with Bluestacks:


You can download many applications like WhatsApp Messenger etc on the Google Play Store with the help of BlueStacks.


## How to Running WhatsApp on PC :
First of all, you need to download Bluestacks in Windows PC or Mac.


Bluestacks Website


BlueStacks Offline Download Links:

  Bluestacks Download Here
(Without Root)


OR

  Download Bluestacks Here
(Pre-rooted with SuperSU)


  and Install it on your pc. After installing Open it.

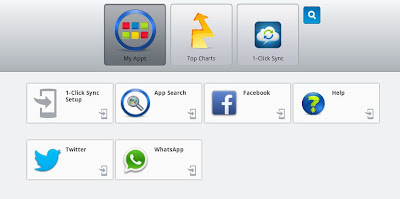
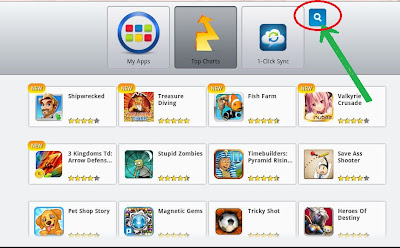
# Now Open the Application You can Find the Screen Capture Just Like Below Picture


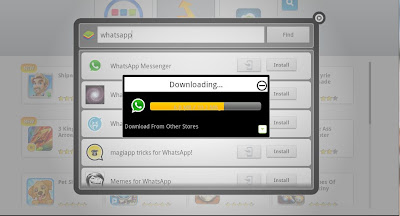
> Now Click on Search icon and search for Whatsapp


> Now choose the whatsapp messenger form any market .its your wish.


> Just click and Download whatsapp after selecting from any
app store


> You can find downloaded app in My Apps.


OR

 Download Whatsapp

> Now click on WhatsApp fill the Details and Start using it.

# Problem with App Player for Surface Pro solved!
If you're having issues with touch response,


click this link:

Win8 Reg File

Click "Yes" to all prompts, restart your Surface and it will work great!
Enjoy,

# Import Contacts From PC To WhatsApp:

 
1) Create a contacts file in Excel.

2) Need to convert Excel sheet to V-Card. V-Card will have .vcf as its file extension. Then convert Excel to.vcf and save those contacts.

3) Open BlueStack application. One more important thing is you need to install file manager application on BlueStack along with WhatsApp.

4) Go To 'C' Drive ---> Program Data
 If you didn't see Program Data don't worry it was hidden. Make sure that folder options should be in 'Show Hidden Files'.

5) Now Program Data > BluStacks > UserData > Shared Folder
Then remove all the folders if have any. Then upload your contacts (V-Card .vcf File).

6) Open File Manager application on BlueStack then Go To > My Files > SdCard > bstfolder
then add every contact file(.vcf) manually.

OR
Backup Your Contacts Using Android Mobile

Android Mobile > Contacts > Option > Export To Sd Card > 0001.vcf

Then Copy & Past in

C:\ProgramData\BlueStacks\UserData\SharedFolder

[[ Past Here ]]

.


Getting Started with WhatsApp Web

WhatsApp has finally arrived on the web, but unfortunately not everyone will be able to use the service.

To provide you with a richer communication experience, WhatsApp is now accessible both on your phone and your computer. WhatsApp Web is a computer based extension of the WhatsApp account on your phone. The messages you send and receive are fully synced between your phone and your computer, and you can see all messages on both devices. Any action you take on the phone will apply to WhatsApp Web and vice versa. At this time, WhatsApp Web is available only for Android, Windows Phone, Nokia S60, BlackBerry and BB10 smartphones.

WhatsApp Web is not another WhatsApp account. When you use WhatsApp on your computer and your phone, you are simply accessing the same account on these two devices.


Requirements to WhatsApp Web:
  • You need to have an active WhatsApp account on your phone.
  • You need to have a stable internet connection on both your phone and your computer.
  • You need to use Google Chrome OR Other web browser. (Firefox/Opera)

To get started with WhatsApp Web you must first pair your phone and computer:

  1. Visit  https://web.whatsapp.com/ 
    on your computer. (Any PC Browser)
     

  2. Open WhatsApp on your phone and go to Option (Menu)
    & Click on WhatsApp Web.


  3. Scan the QR Code on your computer.


    4) Done & Enjoy Whatsapp Web
Note: WhatsApp Web only works if your phone is turned on and connected to the internet, so avoid turning it off or switching to airplane mode if you want the web client to work.
The connection troubleshooting steps for your device: Android | iPhone | BlackBerry | Nokia S40 | Nokia S60 | Windows Phone | BlackBerry 10.

Why can't I connect to WhatsApp Web?


Enjoy... :D


Your Account has been disabled Gmail Error Fixed:


Method 1:
Simple Steps:

Just Open Mobile Browser (Oprea Mini/ Other)
  • Clear cache
  • Clear history
  • Clear all cookie data
  • Clear form data
  • Clear location access
> Done
> Login Again, Problem Solved. :D

OR
Method 2:

>> Use Gmail Android App

OR
Method 3:

Your account has been disabled (Explanation)
If you've been redirected to this page from the sign-in page, it means that access to your Google Account has been disabled.
In most cases, accounts are disabled if we believe you have violated either the Google Terms of Service, product-specific Terms of Service (available on the product page), or product-specific policies. Your account has not been deleted, your data is still intact, and it might be possible to regain access to your account.

Why Google disables accounts:
Google wants to ensure that everyone has a chance to safely and securely connect and communicate.
To help preserve this environment, Google reserves the right to:
  • Suspend a Google Account from using a particular product or the entire Google Accounts system if there is a violation of the Google Terms of Service, product-specific Terms of Service
    (available on the product page), or product-specific policies.
  • Terminate your account at any time, for any reason, with or without notice.

Next steps for disabled accounts:
Please start by reviewing the relevant Terms of Service. Then, if you think your account should not have been disabled, please contact us.
By contacting us to look into this issue, you certify that you’re the owner of the account and consent to allowing us to review the contents of your account to evaluate your request.


>> Google Solution Page

.


Speed up Mozilla Firefox:

# Reduce Firefox’s RAM Usage for Its Cache Feature:

1. Type “about:config” (without quotes) in the address bar of your Firefox and press Enter.

2. Find “browser.sessionhistory.max_total_viewer

3. Set the value to “0” (Zero)

# Cut Down Ram Usage to 10 MB when Firefox is Minimized:

1. Type “about:config” (without quotes) in the address bar of your Firefox and press Enter.

2. Right click in the page and select “New” > “Boolean

3. In the pop-up box that appears, enter “config.trim_on_minimize” and hit Enter

4. Select True and press Enter.

# Increase the Page Load Speed of Firefox:

Normally the browser makes one request to a web page at a time. When you enable pipelining, it will make several requests at once, which really speeds up page loading.

1. Type “about:config” (without quotes) in the address bar of your Firefox and press Enter.

2. Find and Set “network.http.pipelining” to “true

3. Find and Set “network.http.proxy.pipelining” to “true

4. Find and Set “network.http.pipelining.maxrequests” to some number like “10”. (Meaning that it will make 10 requests at once.)

5. right click anywhere in the configuration window and from the pop-up menu select: “New” > “Integer

Name it “nglayout.initialpaint.delay

Set its value to “0” (Zero)

This value represents the amount of time the browser waits before acting upon the information it has received. If you are using a broadband connection, your pages will load faster now.

# Get Even Faster Web Browsing:

1. Type “about:config” (without quotes) in the address bar of your Firefox and press Enter.

2. Right click in the window and choose “New” > “Integer” or “String

3. Enter “network.dns.disableIPv6” in the pop-up box and set value to “false”.

4. Repeat step 2, and enter “content.notify.backoffcount” in the pop-up box and set value to “5”.

5. Repeat step 2 and enter “plugin.expose_full_path” and set value to “true”.

6. Repeat step 2 and enter “ui.submenuDelay” and set value to “0” (Zero).

Restart Firefox.


More Tweaks:
MORE FIREFOX Hack Tweaks


Link2SD is an application manager that makes it easy for Android users on their phone to move applications to the SD card.

Description:
Link2SD is an application manager that makes it easy for Android 2.1+ users to move applications to the SD card, to clean all cache files of the apps. It enables you to manage your apps and storage easily.It also provides native app to SD (app2sd) features on Android 2.2 and higher. It can move any non-protected user apps to SD card (force move), with batch moving capability.
That feature uses Android's standard SD-card installation feature and does not require a second partition.
Cache cleaner function clears all your cache and free up space with a single tap. Also cache cleaner widget displays total cache size and enables "one tap cache cleaning" without opening the app.

Features:

✔ App manager
✔ Create and remove link for apk, dex and lib files of the app.
✔ Plus version also links private data files of the apps
✔ Automatically link newly installed apps (optional)
✔ Move any user apps to SD even though the app does not support moving to SD
    
(a.k.a. "force move", for Android 2.2 and higher)
✔ Shows the apps that support moving to SD with native apps2sd
✔ Set the default install location of the apps; auto, internal, or external
✔ Batch link, unlink, reinstall, uninstall, "move to SD", "move to phone" functions
✔ Notify when movable apps installed
✔ Uninstall system applications (bloatware removal)
✔ Freeze and un-freeze system and users applications
✔ Convert system apps into user apps
✔ Convert user apps into system apps
✔ Integrate "Updated" system apps into system (ROM)
✔ Clear data and cache of the application
✔ Batch clear data and cache of the selected apps
✔ Clear all apps cache at once (1-tap cache cleaner without being root)
✔ Exclusion list for "Clear all app cache" function
✔ Clear cache widget (1-tap cache cleaner without being root)
✔ Notify if total cache size exceeds specified size
✔ Reboot manager includes power off, normal reboot, quick (hot) reboot, reboot recovery,
    reboot bootloader / download mode
✔ Reboot widget to boot with one click
✔ List applications, show detailed size information and link status
✔ Wide variety of options to sort and filter apps
✔ Search applications by name
✔ Display available space information of internal storage, SD card and SD card 2nd partition
✔ Share the Play Store link or the APK (app's full package) file of the apps
✔ Create shortcut for the apps
✔ Support 40+ languages

Plus features:
✔ Links internal data directories of the apps to SD card
✔ Links dex files of the system apps to SD card
✔ Auto clear cache service
✔ Removes ads from Link2SD


What you Need for Linking Apps:
● Root permission.
● Second partition on your SD card.

  • You should have two partitions on SD card and both should be primary.
    The first FAT partition is your standard SD card storage. The second partition is used for application files and can be ext2, ext3, ext4, f2fs or FAT.
  • You need to use a non-FAT file system (ext2, ext3, ext4 or f2fs) on your second partition in order to link app's private data files. Because the FAT file system (FAT16, FAT32 or exFAT) does not support UNIX file ownership or permissions and causes a security breakdown of app's private files.
    Link2SD Plus can move app's private data files if you have a non-FAT partition
  • Link2SD does not create the second partition, you need to create it yourself. You can use any partition manager such as Minitool, Paragon, Easeus etc. for this.
  • When you connect your phone to PC as mass storage, Android unmounts the first FAT partition but the second partition remains mounted. Therefore linked applications are not affected and can be run without problems.
Link2SD is free (ad supported) application.

DISCLAIMER:
It is made available for use at your own risk with no warranty of any kind.

>> Link2Sd FAQ


Download from Play Store:
 Download Here

Author Name

{picture#https://instagram.fbom1-2.fna.fbcdn.net/t51.2885-19/s150x150/17662158_221658868312088_138323287238246400_a.jpg} Hi, I am Swapnil Zambare. I love to explore Computer and Internet. My aim is to spread tips and tricks related to Hacking, Computer, Android phones, Blogging, SEO, Social networks and many mores all over the world for free so that every one can enjoy our Premium Services for Completely Free. {facebook#https://www.facebook.com/SwapnilTech} {twitter#https://twitter.com/swapnilzambare7} {google#YOUR_SOCIAL_PROFILE_URL} {pinterest#YOUR_SOCIAL_PROFILE_URL} {youtube#YOUR_SOCIAL_PROFILE_URL} {instagram#https://www.instagram.com/theswapnilzambare/}

Contact Form

Name

Email *

Message *

Powered by Blogger.