Articles by "PC Tips n Tricks"

Showing posts with label PC Tips n Tricks. Show all posts


1. Shut down the computer completely
2. When starting up press the F2 key repeatedly as it starts up.
3. You should hopefully be met with a screen like this, or atleast something like this.

4. Use the arrow keys to scroll right and stop when you hit the security tab.
5.Go to The admin password section.
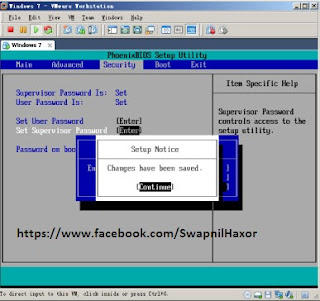
 

6. Press enter
7. Type in the new password
8. Press esc and choose "Save And Exit"
9. Wait for the computer to boot up
10. Type in the admin account name and password.
11. Yo..! You have admin access.
Remember to use this discreetly, as the tech team can see the new accounts, and password changes. And DO NOT go off bragging to someone about this, as you could end up in big trouble.

.


Lock PC Temporarily When Someone Enter
Wrong Password in:

> click on "Start" button

> Type "Local Security Policy" in search program and files box.

> Now click on"Local Secruity Policy"


> From left window pane expand "Account Policies"


> Then double click on "Account Lockout Policy"


> After that Double click on "Account Lockout threshold"


> Now a new window will appear


> In That window give the "Value" after how many invalid

> Password login attempts you want to lock your pc

> Now click apply


> Another window will appear click "Ok"


> Process Completed

Many a time, it becomes necessary for us to write protect our USB flash drive so as to protect it from viruses and other malware programs.
Because flash drives are so popular and most widely used to move data between computers, they are the prime target for attackers as a means to get infections spread around the computer world. Also, since USB drive is not a Read-Only Memory (ROM), the data inside it can easily be modified or deleted by malware programs.
But unfortunately, most of the new flash drives do not come with a write-protect feature as the manufacturers wish to cut down the cost of production. Hence, the only way to write-protect your USB flash drives is to enable this feature on your own computer.

This can be done by adding a small entry to the Windows registry which acts as a switch that can be enabled to make use of the write protection or disabled to allow write access. Just follow these steps:

1. Open the Registry Editor (Open the “Run” dialog box, type regedit and hit “Enter”).

2.Navigate to the following Registry key:
HKEY_LOCAL_MACHINE\SYSTEM\CurrentControlSet\Control\

3. Create a New Key named as StorageDevicePolicies. To do this right-click on Control, and click on New->Key and name it as StorageDevicePolicies.

4. Now right-click on  StorageDevicePolicies and create a New->DWORD (32-bit) Value and name it as WriteProtect.

5. Double-click on WriteProtect and set the Value data to 1.

> Now the right-protection for USB drives is enabled on your computer (no restart required) and thus it would not be possible for anyone or any program to add/delete the contents from your USB flash drive. Any attempt to copy or download the files onto the USB drive will result in the following error message being displayed.

> To revert and remove the write-protection, all you need to do is just change the Value data for WriteProtect (Step-5) from 1 back to 0. Now write access to all the USB devices is re-enabled...

.

When you install Windows XP an Administrator Account is created
(you are asked to supply an
administrator password), but the
“Welcome Screen” does not give you
the option to log on as Administrator
unless you boot up in Safe Mode. First you must ensure that the

Administrator Account is enabled:
1. Open Control Panel
2. Open Administrative Tools
3. Open Local Security Policy
4. Expand Local Policies 5. Click on Security Options
6. Ensure that Accounts: Administrator
account status is enabled. Then follow the instructions from the
“Win2000 Logon Screen Tweak” ie;
1.Open Control Panel
2. Open User Accounts
3. Click Change the way users log on
or log off 4. Un-tick Use the Welcome Screen
5. Click Apply Options

You will now be able to log on to
Windows XP as Administrator in
Normal Mode.

# Another Method:

By default windows XP doesn’t show
the Administrator in the user list at the welcome screen. Here’s a way to
get around it. Now head up to
HKEY_LOCAL_MACHINE\Software
\Microsoft\WindowsNT
\CurrentVersion\
Winlogon\SpecialAccounts\User list
create a new DWORD entry and name it as Administrator and change its value to 1.
exit and reboot for the changes to
take effect.
To change it back change its value to 0
or simply delete the key.

.

#The Run command on Microsoft Windows operating system allows you to directly open an application or document with just a single command instead of navigating to it’s location and double-clicking the executable icon. However, it only works for some of the inbuilt Windows programs such as Command prompt (cmd), Calculator (calc) etc. So, have you ever wondered how to create your own customized Run commands for accessing your favorite programs, files and folders? Well, read on to find out the answer.

>Creating the Customized Run Command

Let me take up an example of how to create a customized run command for opening the Internet explorer. Once you create this command, you should be able to open the Internet explorer just by typing “ie” (without quotes) in the Run dialog box. Here is how you can do that.

1. Right click on your Desktop and select New -> Shortcut.

2. You will see a “Create Shortcut” Dialog box as shown below


Create Shortcut


3. Click on “Browse”, navigate to: Program Files -> Internet Explorer from your Root drive (usually C:\) and select “iexplore” as shown in the above figure and click on “OK”.

4. Now click on “Next” and type any name for your shortcut. You can choose any name as per your choice; this will be your customized “Run command”. In this case I name my shortcut as “ie”. Click on “Finish”.

5. You will see a shortcut named “ie” on your desktop. All you need to do is just copy this shortcut and paste it in your Windows folder (usually “C:/Windows”). Once you have copied the shortcut onto your Windows folder, you can delete the one on your Desktop.

6. That’s it! From now on, just open the Run dialog box, type ie and hit Enter to open the Internet Explorer.

In this way you can create customized Run commands for any program of your choice. Say “ff” for Firefox, “ym” for Yahoo messenger, “wmp” for Windows media player and so on.

To do this, when you click on “Browse” in the Step-3, just select the target program’s main executable (.exe) file which will usually be located in the C:\Program Files folder. Give a simple and short name for this shortcut as per your choice and copy the shortcut file onto the Windows folder as usual. Now just type this short name in the Run dialog box to open the program.


.

How To Recover Deleted Files (Recuva):

If you have deleted some of your important files accidently then the first thing you will do is panic.But I am going to teach you how you can recover your deleted files.Using this method you can recover files that have been

Deleted from the Recycle bin
The files which have been permanently deleted using SHIFT+DELETE key
Files deleted from your Memory Card
Before starting the tutorial for recovering the deleted files I will explain the basics of file deletion which will help you understand that how and why file recovery is possible.

How File Deletion Works

Whenever you move a file to recycle bin or permanently delete a file the file is actually not deleted from the hard-disk instead that file space is marked as free by the operating system so that new files can be written at that space.So, if no new file is written at that place then you can recover the file easily but if you have placed some data in that particular drive then it is possible that the data be written on the same location from where you have deleted your file.It will make the data recovery difficult or impossible.

Note:-Donot put any new data on the Drive from which you have to recover you data because it may hamper your data recovery chances.

This method works on windows platform and is completely free.

Now,Lets begin the step by step tutorial with screenshots on How To Recover Deleted Files In Windows


1.Download Recuva .It is a freeware utility.

 >> Recuva Download Here (3.7MB) <<

2.Install Recuva and it will ask what sort of file you want to recover.Example pictures,movies.Now select the drive.

3.It will scan and show you all the files that have been deleted from that particular drive

4.After completion of the drive is complete it will show two types of files.

# Those with green icons can be recovered.
# Those with red icons cannot be recovered easily.

5.Right click on the file to be recovered and select Recover Highlighted and your file will be recovered.

.

Add Control Panel to your Desktop Right Click Menu:

Adding an item to your right click menu of desktop allows you to access that item easily. You can add any item which you want to use frequently. Today i am writing a trick about adding control panel. If you want to add control panel to your right click menu of desktop as shown in figure. follow given steps below.
steps to add


1: Open up regedit.exe through the start menu search or run box, and then navigate down to the following key:
HKEY_CLASSES_ROOT\Directory\Background\shell


2: Once you are there, you’ll want to right-click on “shell” and create a new key called Control Panel.


3: Under that one, you’ll want to right-click and create a new key called “command”.


4: Select the “command” key on the left-hand side, and then set the (Default) value on the right-hand side to the following:
rundll32.exe shell32.dll,Control_RunDLL


5: You can immediately see the new item in your desktop menu, and it would be working. To remove, simply delete the Control Panel key.

.

Author Name

{picture#https://instagram.fbom1-2.fna.fbcdn.net/t51.2885-19/s150x150/17662158_221658868312088_138323287238246400_a.jpg} Hi, I am Swapnil Zambare. I love to explore Computer and Internet. My aim is to spread tips and tricks related to Hacking, Computer, Android phones, Blogging, SEO, Social networks and many mores all over the world for free so that every one can enjoy our Premium Services for Completely Free. {facebook#https://www.facebook.com/SwapnilTech} {twitter#https://twitter.com/swapnilzambare7} {google#YOUR_SOCIAL_PROFILE_URL} {pinterest#YOUR_SOCIAL_PROFILE_URL} {youtube#YOUR_SOCIAL_PROFILE_URL} {instagram#https://www.instagram.com/theswapnilzambare/}

Contact Form

Name

Email *

Message *

Powered by Blogger.